🎉 Celebrate Festivals with Special Offers! 🎁 Special Discount: Enjoy 20% OFF 🎉 Offer valid till 28-02-2025. 🎉 Celebrate Festivals with Special Offers! 🎁 Special Discount: Enjoy 20% OFF 🎉 Offer valid till 28-02-2025.
🎉 Celebrate Festivals with Special Offers! 🎁 Special Discount: Enjoy 20% OFF 🎉 Offer valid till 28-02-2025. 🎉 Celebrate Festivals with Special Offers! 🎁 Special Discount: Enjoy 20% OFF 🎉 Offer valid till 28-02-2025.
Lead Management
Boost Your Lead Management Efficiency
Simplify and streamline your lead management process with 365 CRM. Contact us today and discover how we can help you capture, nurture, and convert leads effortlessly!
What is Lead management in 365 CRM?
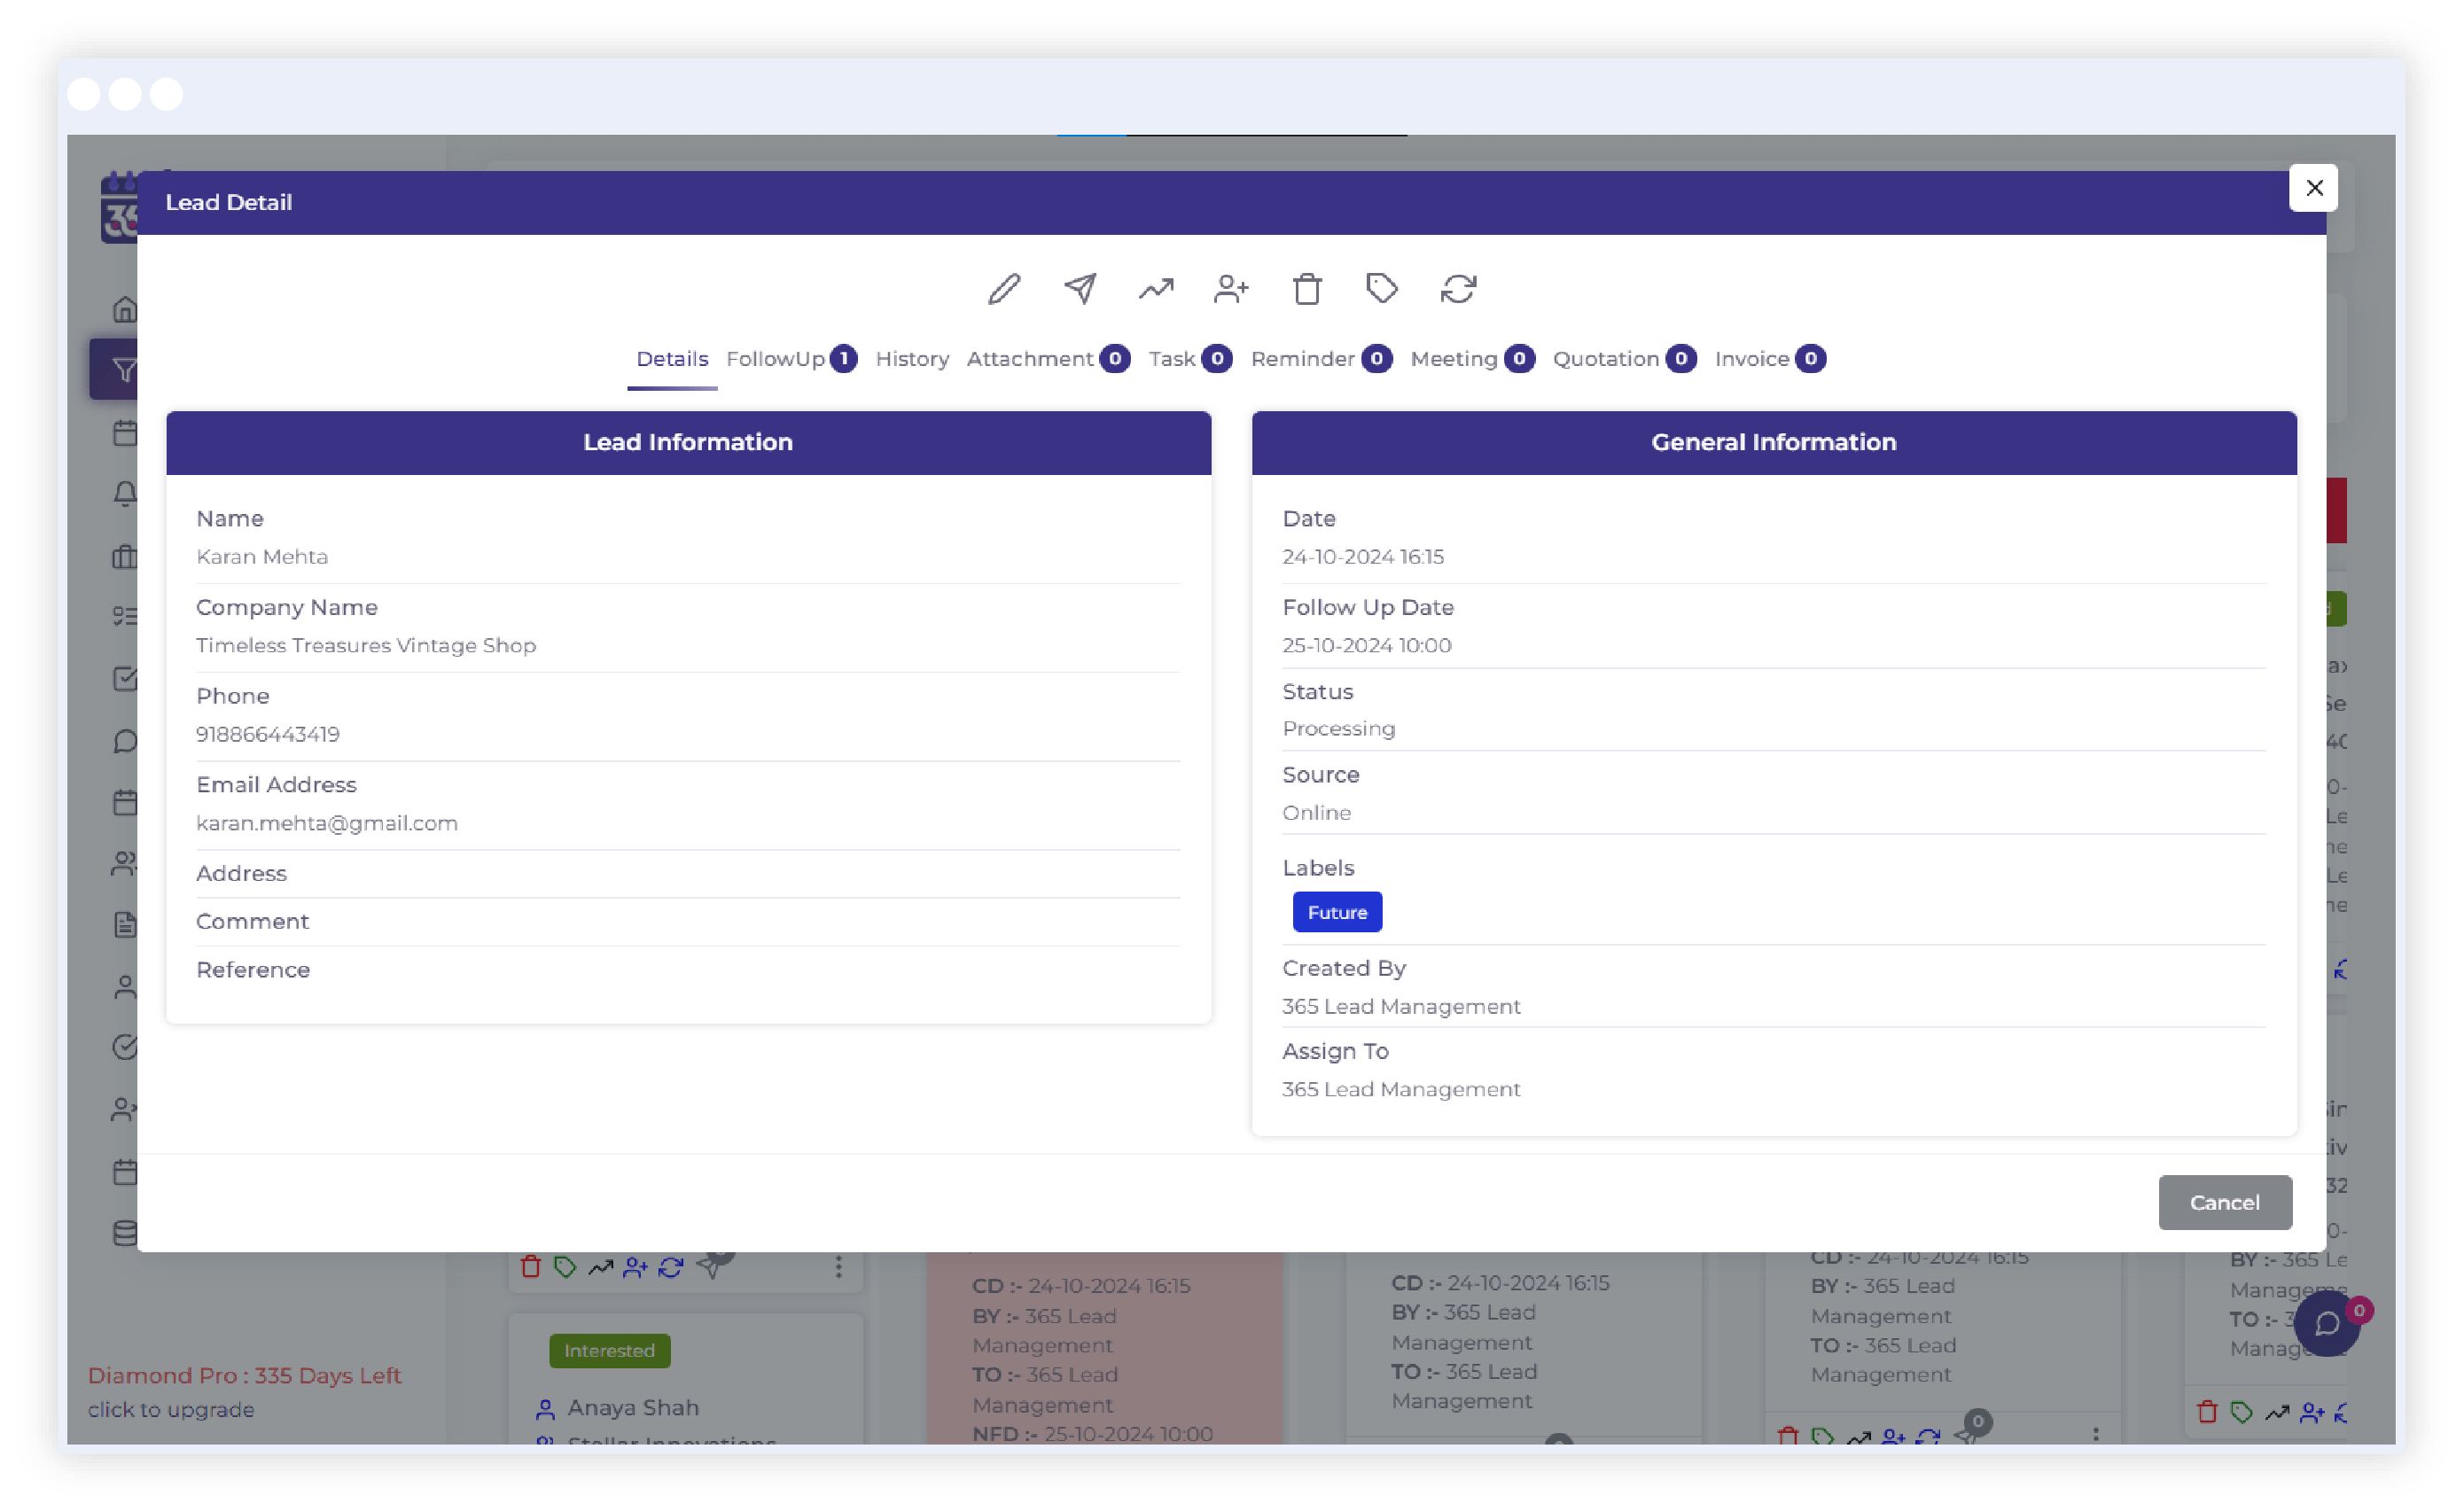
Lead management is the process of capturing, tracking, and managing potential customers from Inceptive interest to conversion. A well-structured lead management process begins with generating and capturing leads through marketing efforts, followed by qualifying them based on criteria such as budget, needs, and intent. Using a CRM lead management platform or a reliable lead management tool simplifies this process by organizing and prioritizing leads effectively. Qualified leads are assigned to sales teams for follow-up, while others are nurtured through personalized communication until they are ready to make a purchase.
Lead tracking and analysis, often conducted through CRM systems, monitor engagement levels and help refine strategies. Effective lead management streamlines sales processes, prioritizes high-potential opportunities, enhances customer experiences, and drives revenue growth.
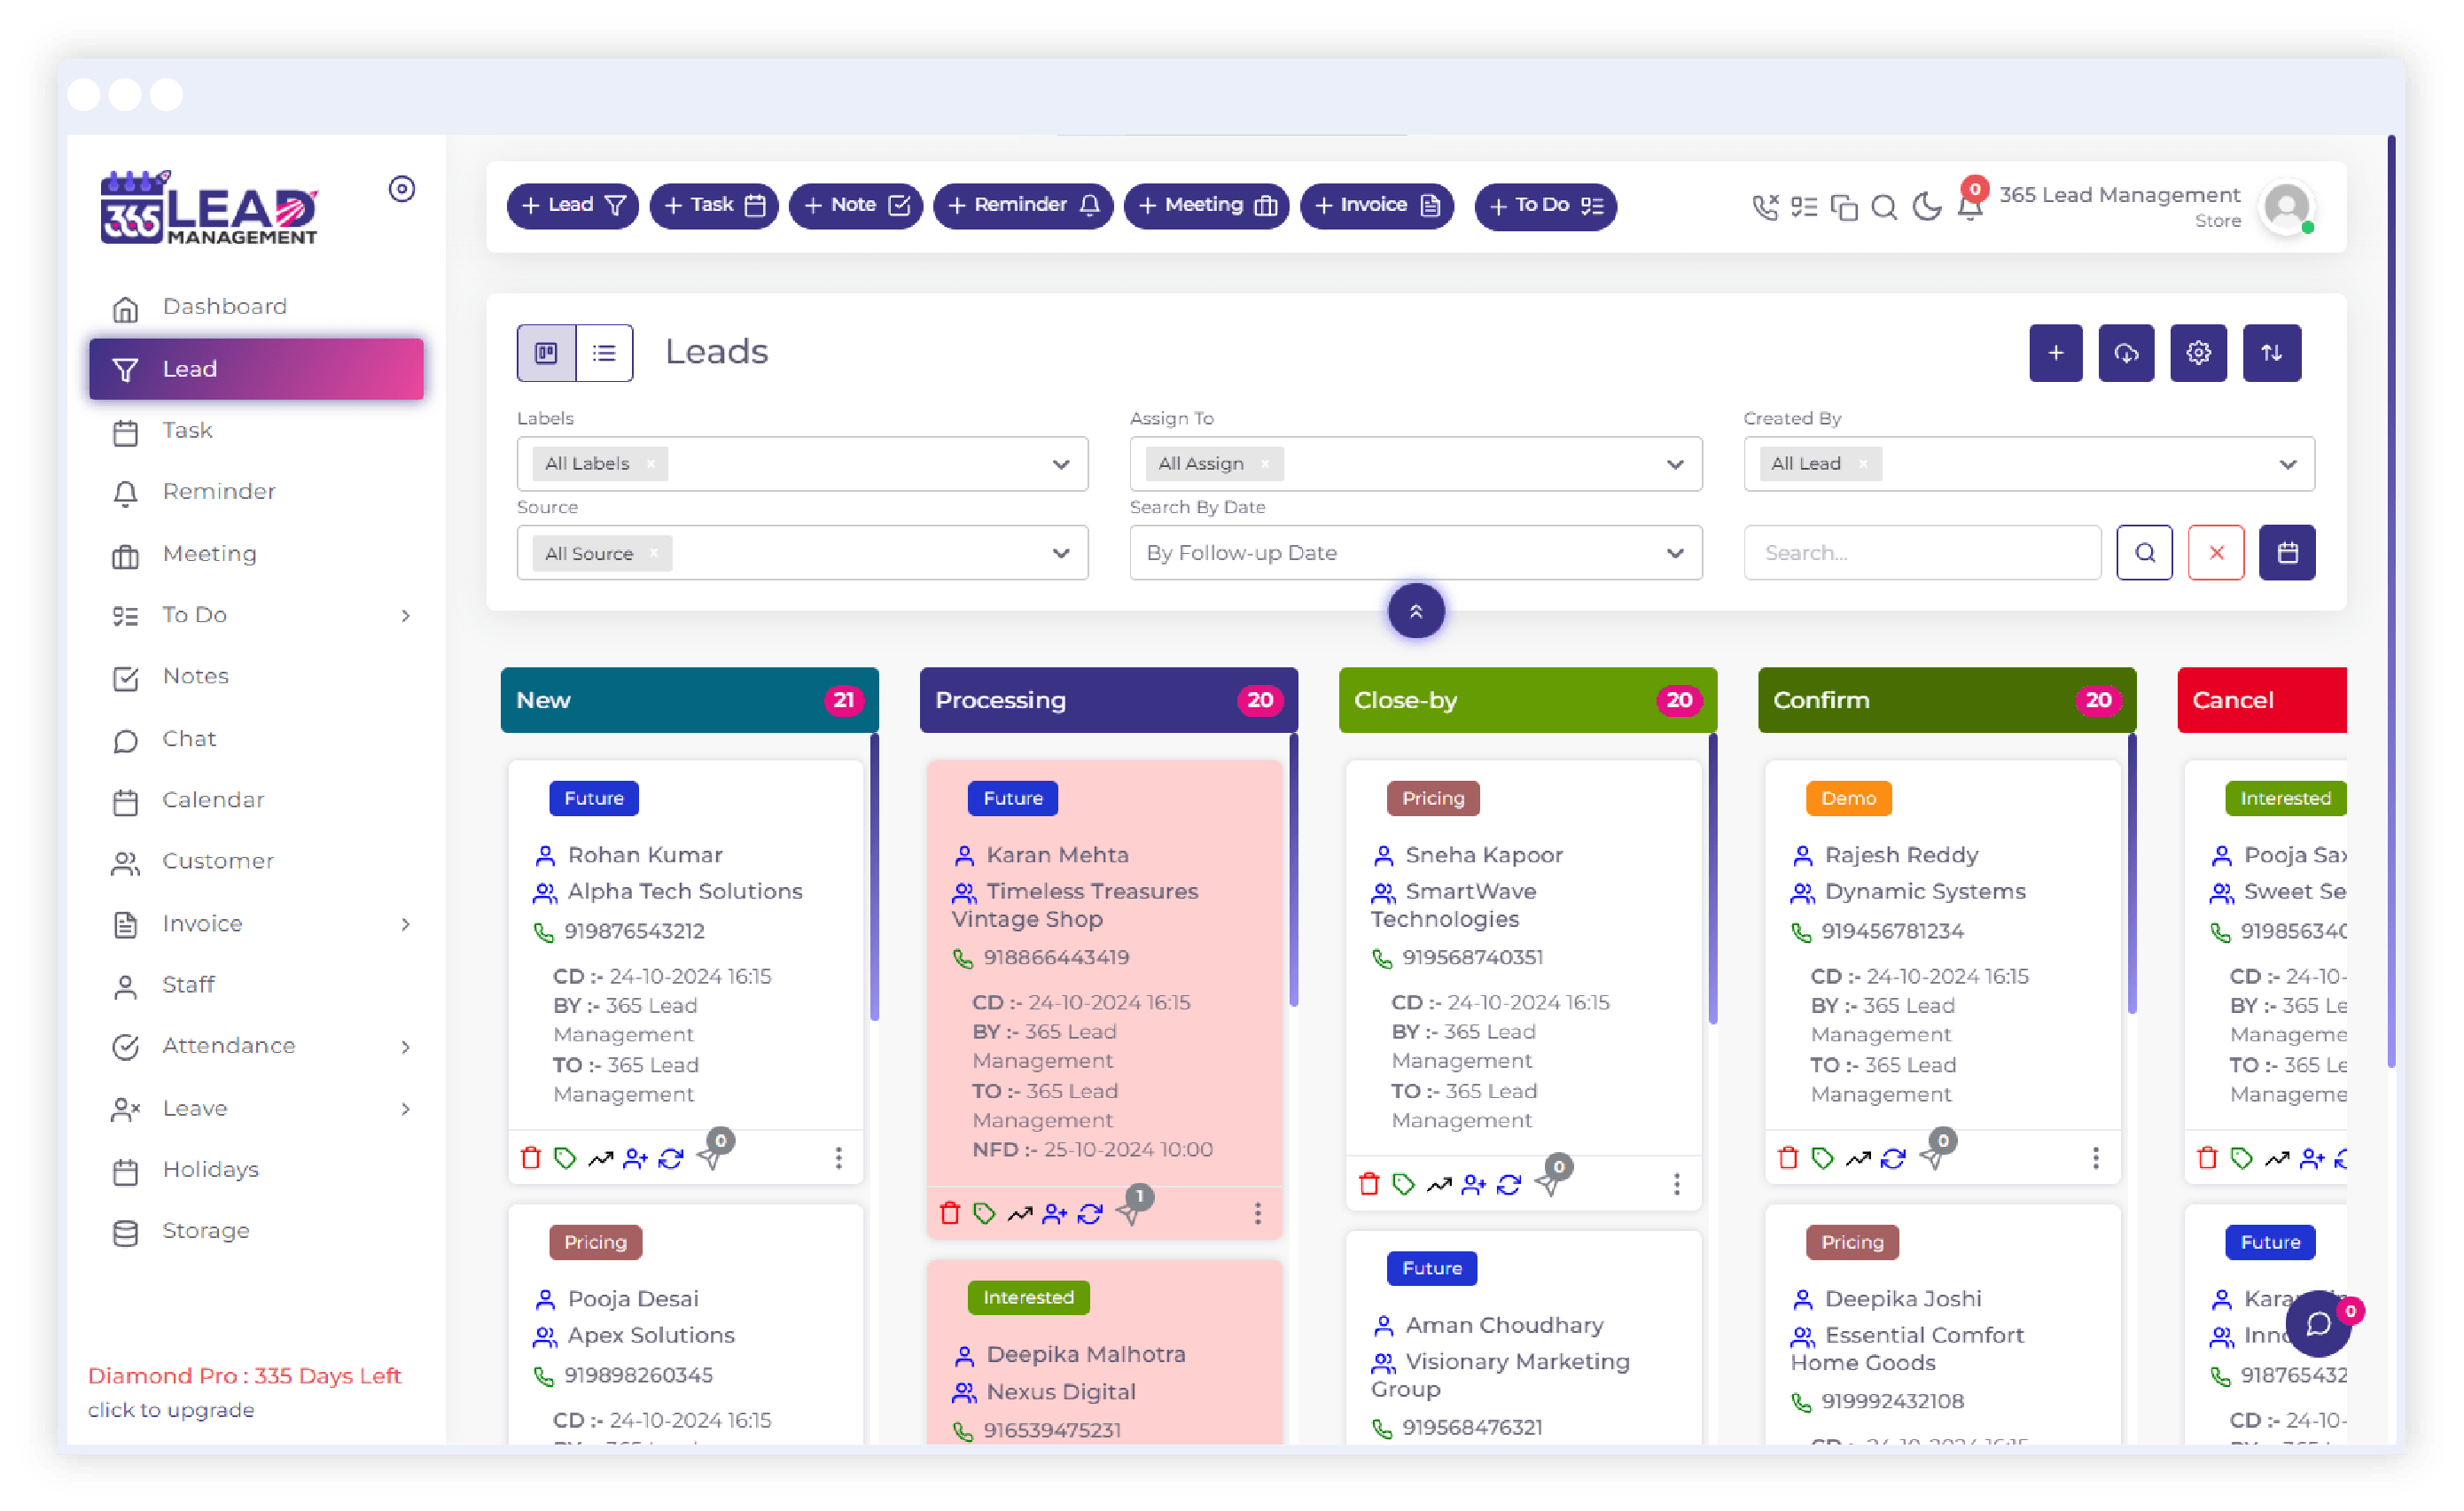
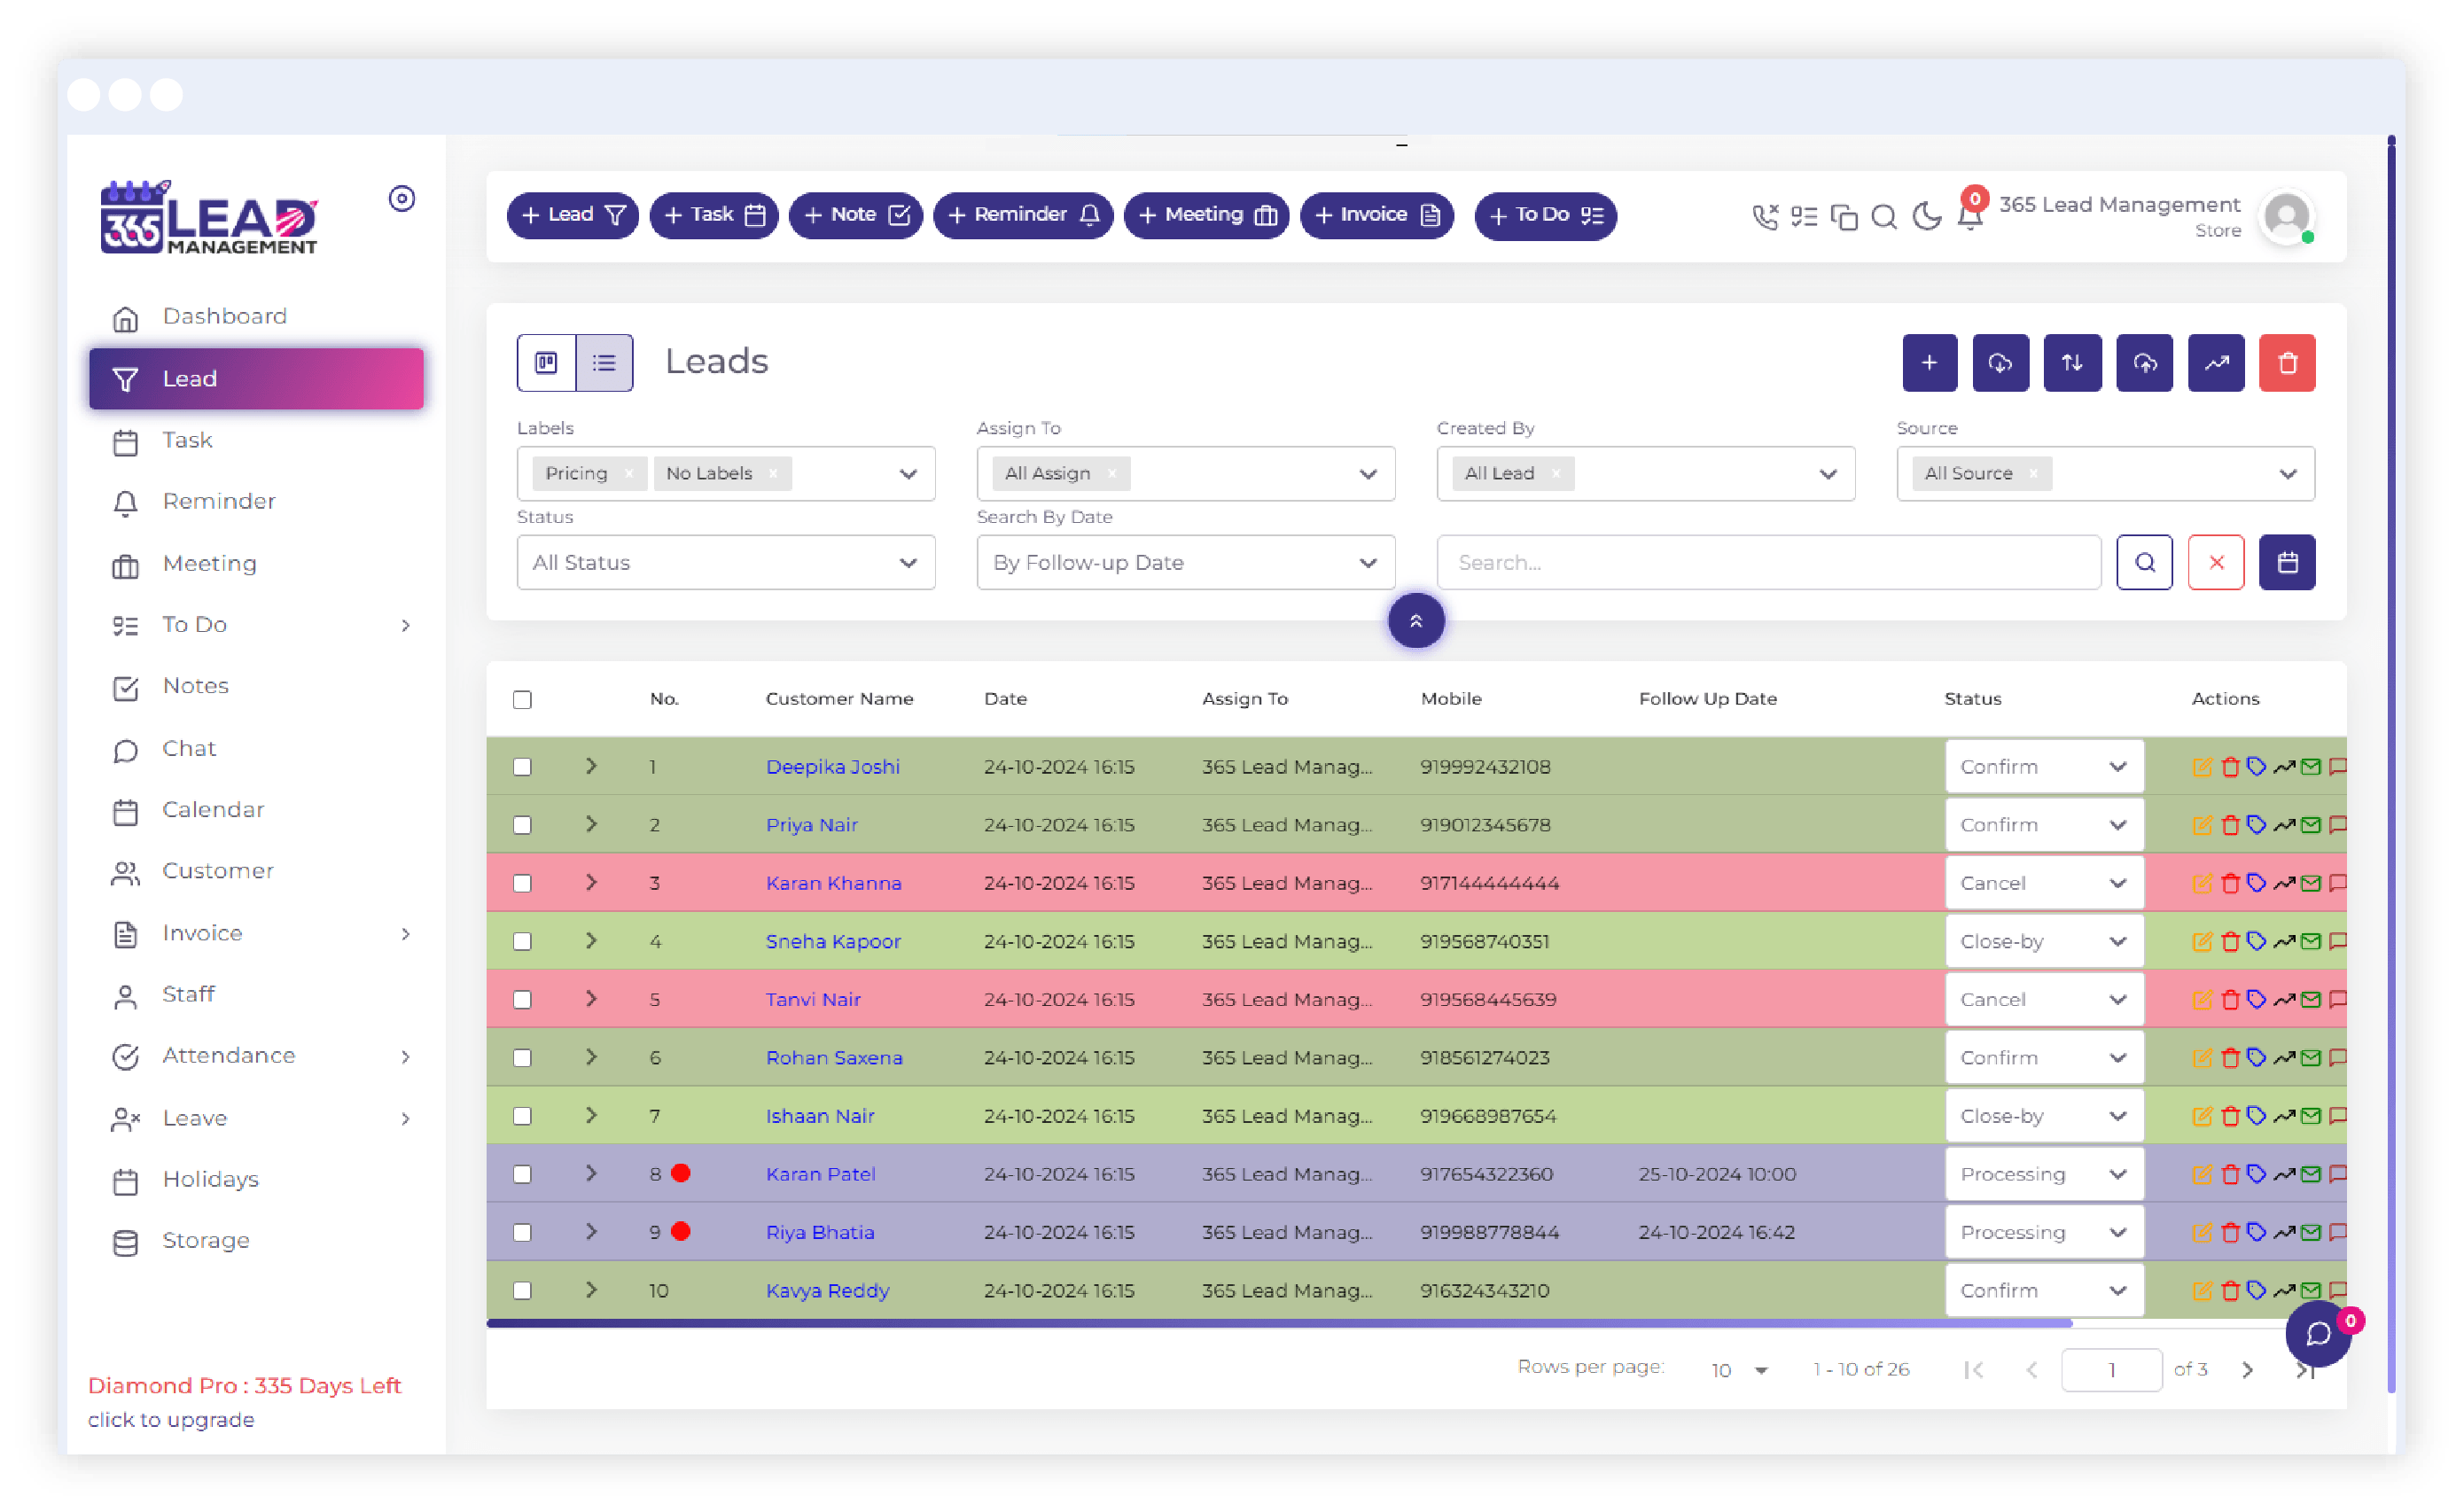
- Lead Generation: Attracting leads through marketing efforts like ads, social media, and referrals.
- Qualification: Evaluating leads based on budget, needs, and intent to identify high-potential prospects.
- Distribution: Assigning qualified leads to the right sales team members for follow-up.
- Nurturing: Engaging unready leads with personalized communication until they’re prepared to buy.
- Tracking & Analysis: Using CRM tools to monitor interactions, refine strategies, and prioritize opportunities.
- Closing: Presenting solutions and addressing objections to convert leads into customers.
- Post-Sale Follow-Up: Ensuring satisfaction, encouraging repeat business, and building long-term relationships.
Stay Ahead of the Competition
Connect with us to explore innovative solutions designed to fuel your business growth.
Why Effective Lead Management Matters?
- Streamlines the Sales Process: Helps sales teams focus on high-potential leads.
- Prioritizes Opportunities: Maximizes conversion by focusing on the most promising leads.
- Improves Customer Relationships: Through personalized communication and timely follow-ups.
- Boosts Revenue Growth: By converting more leads and nurturing long-term relationships.
Lead Management FAQs
If you don't see an answer to your question, you can send us an email from our contact form.
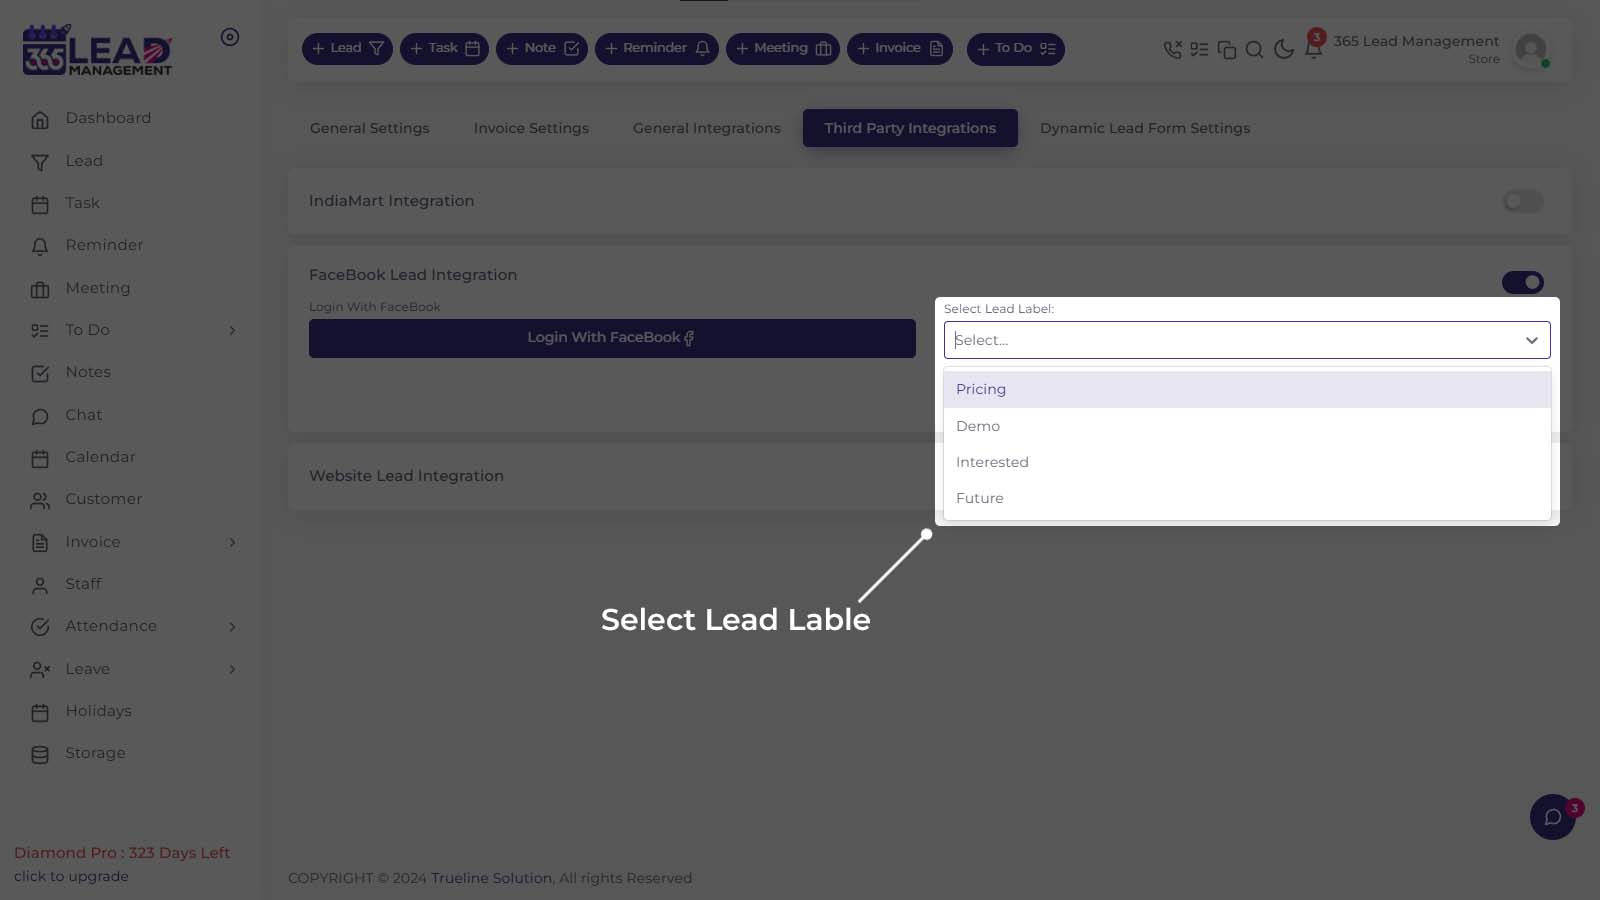
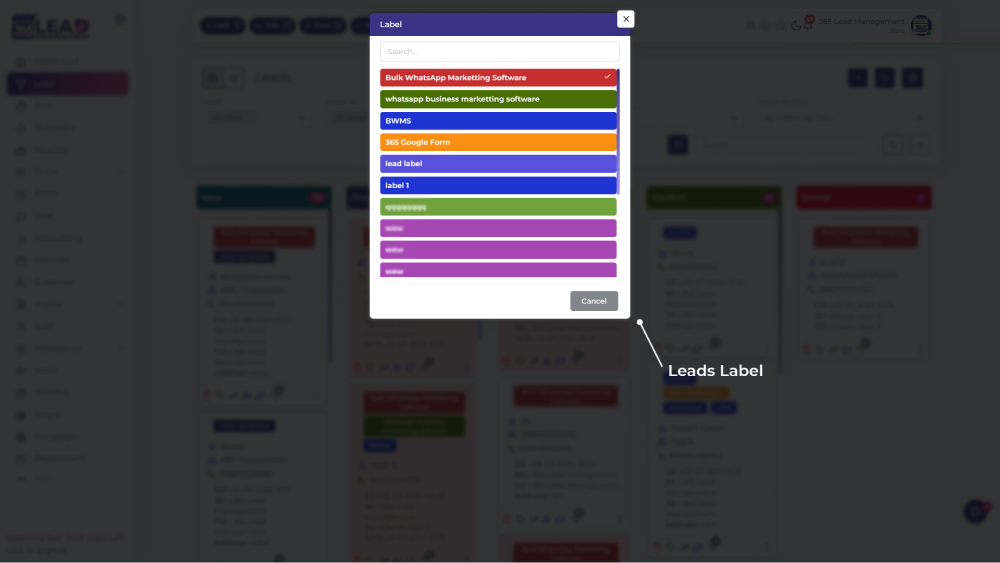
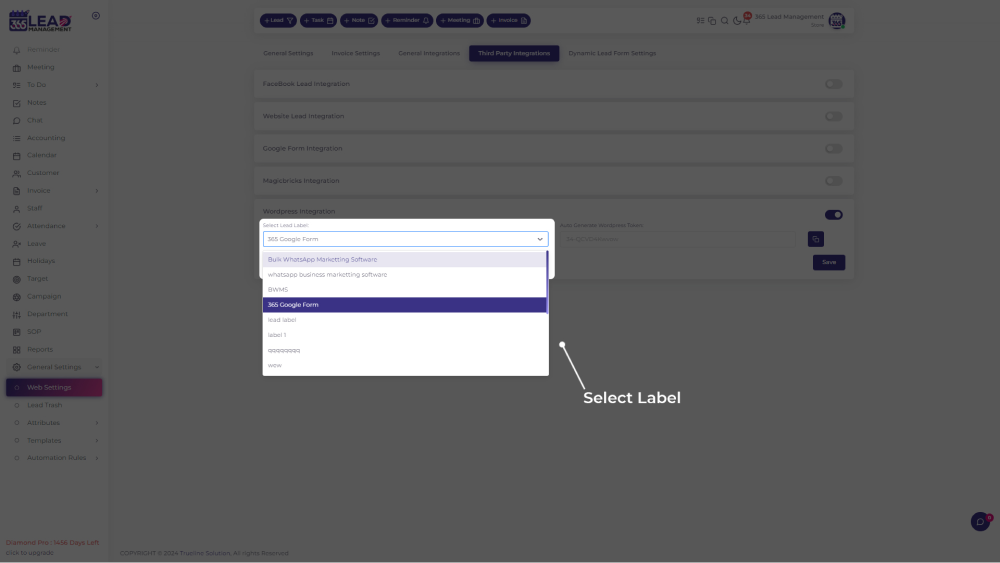
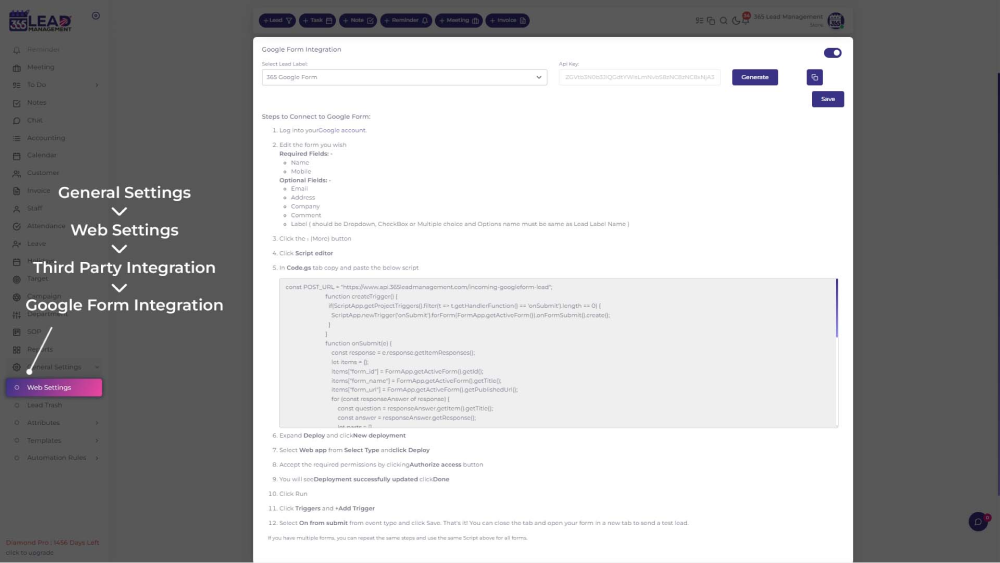
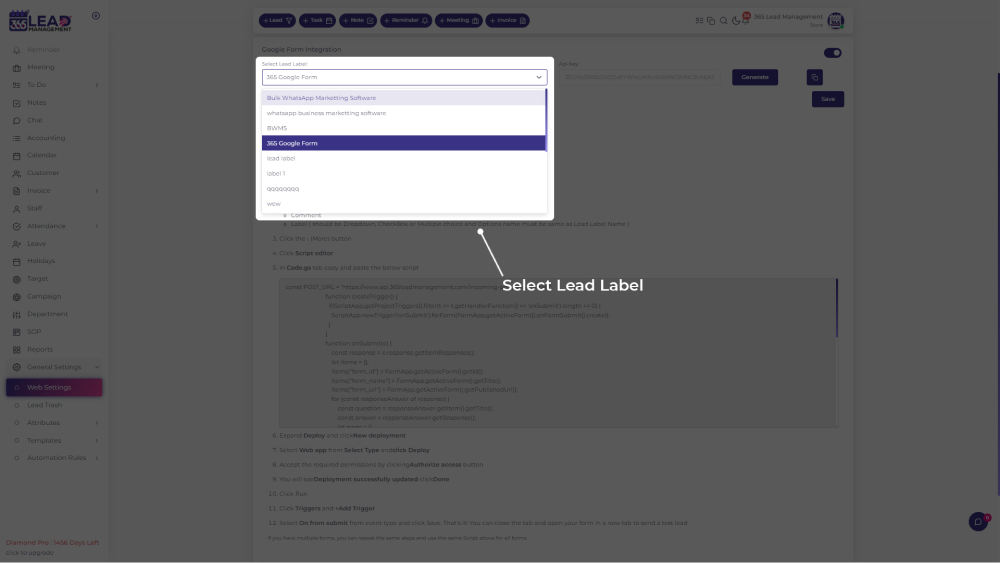
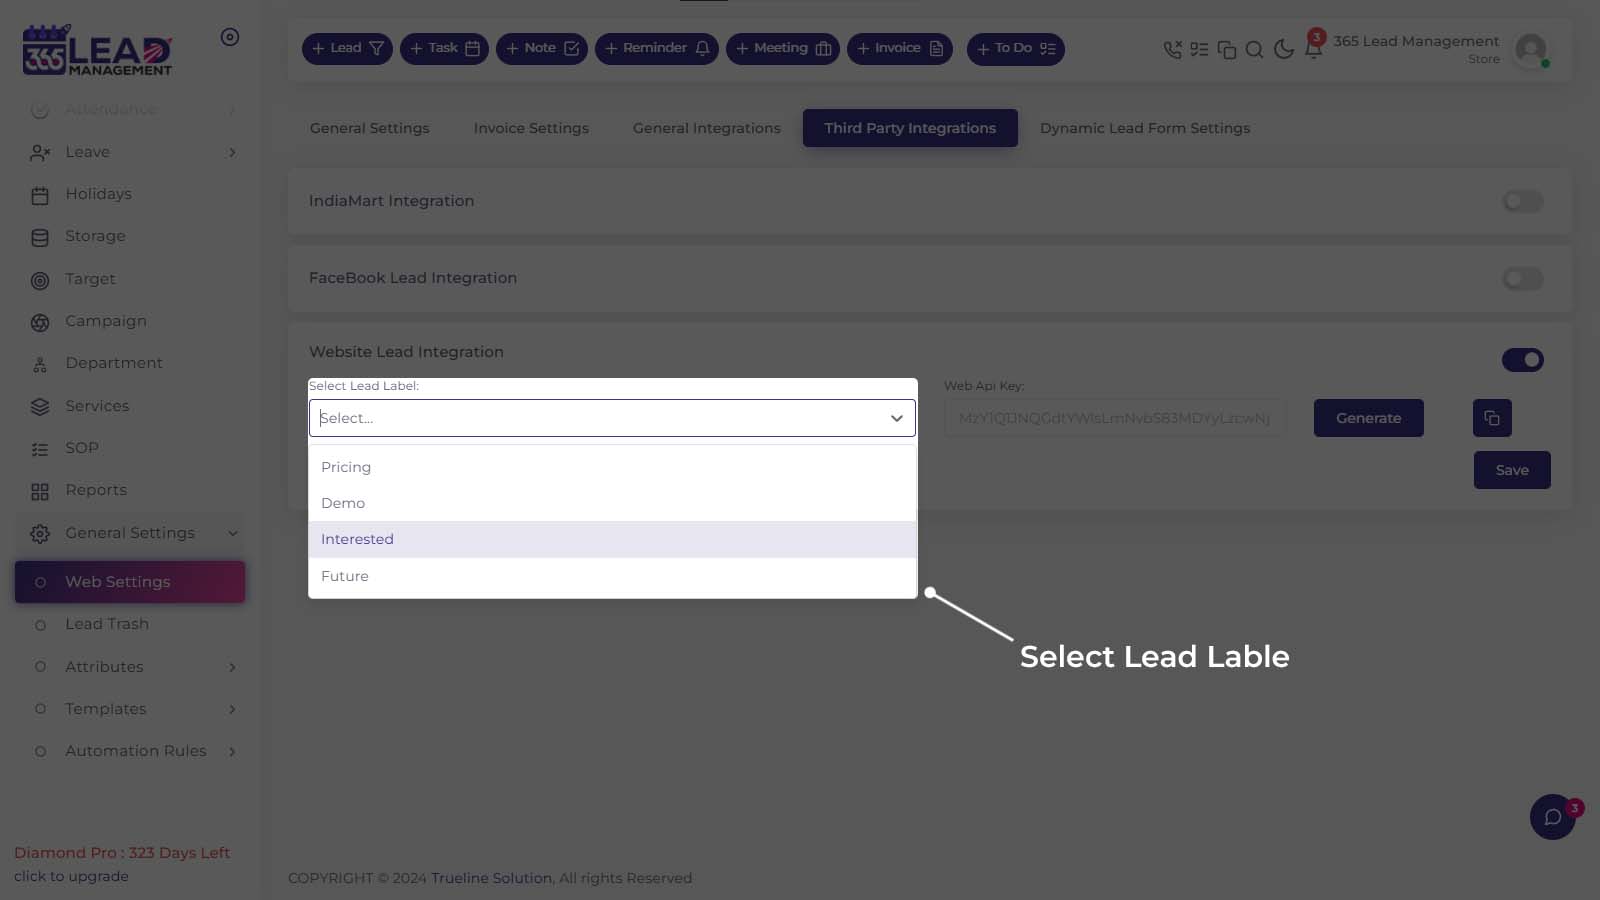
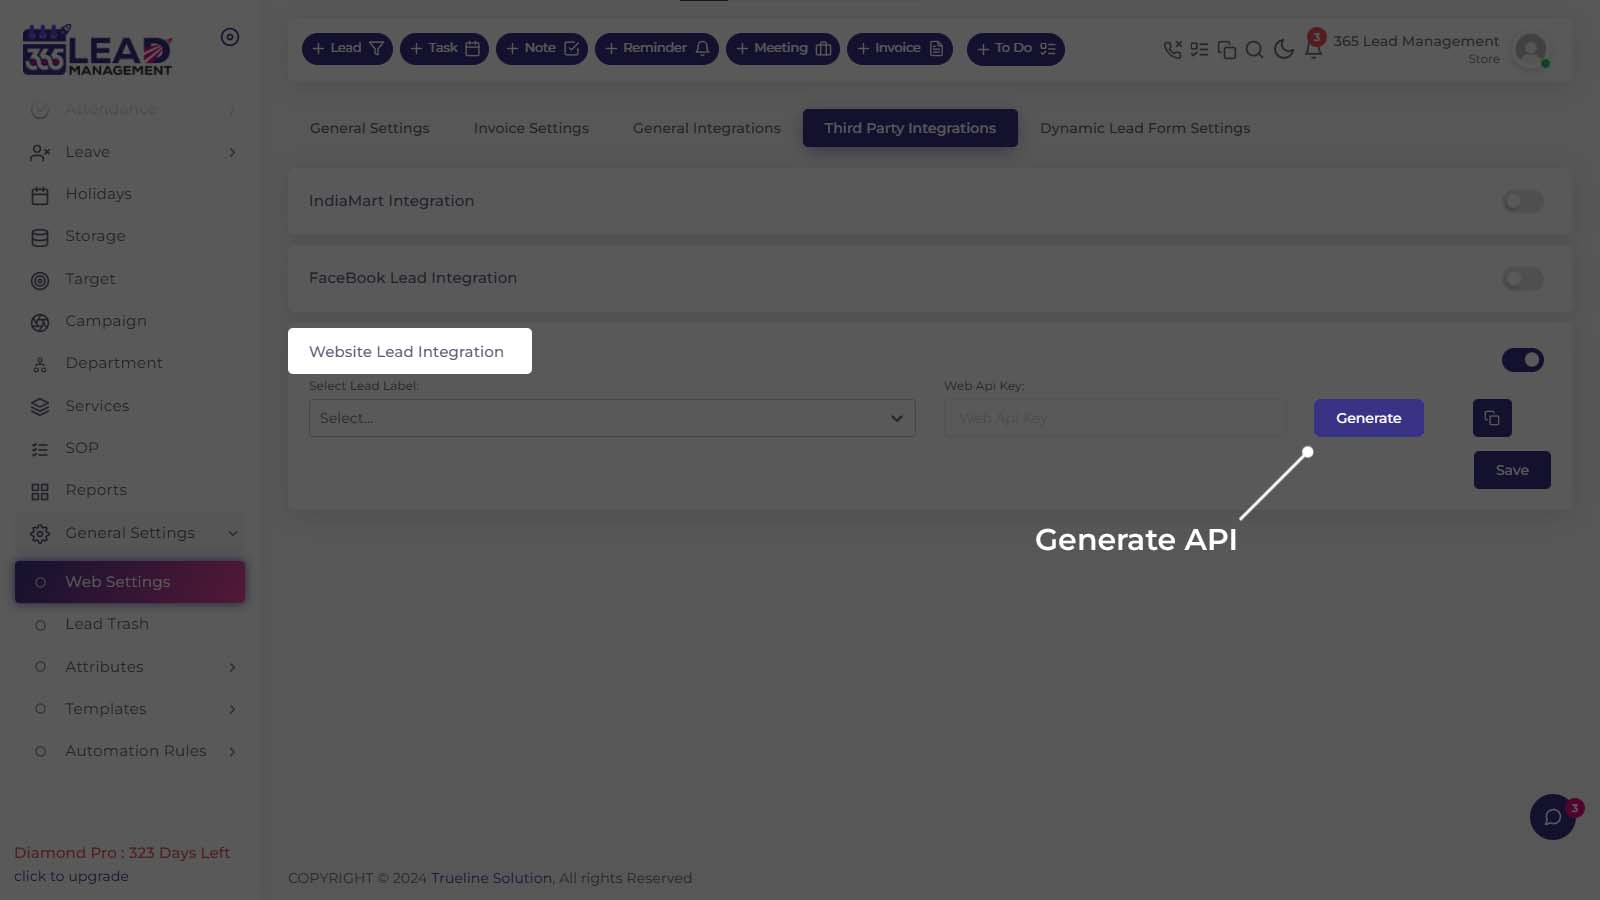
Step 2 : Select Lead Label & Generate API
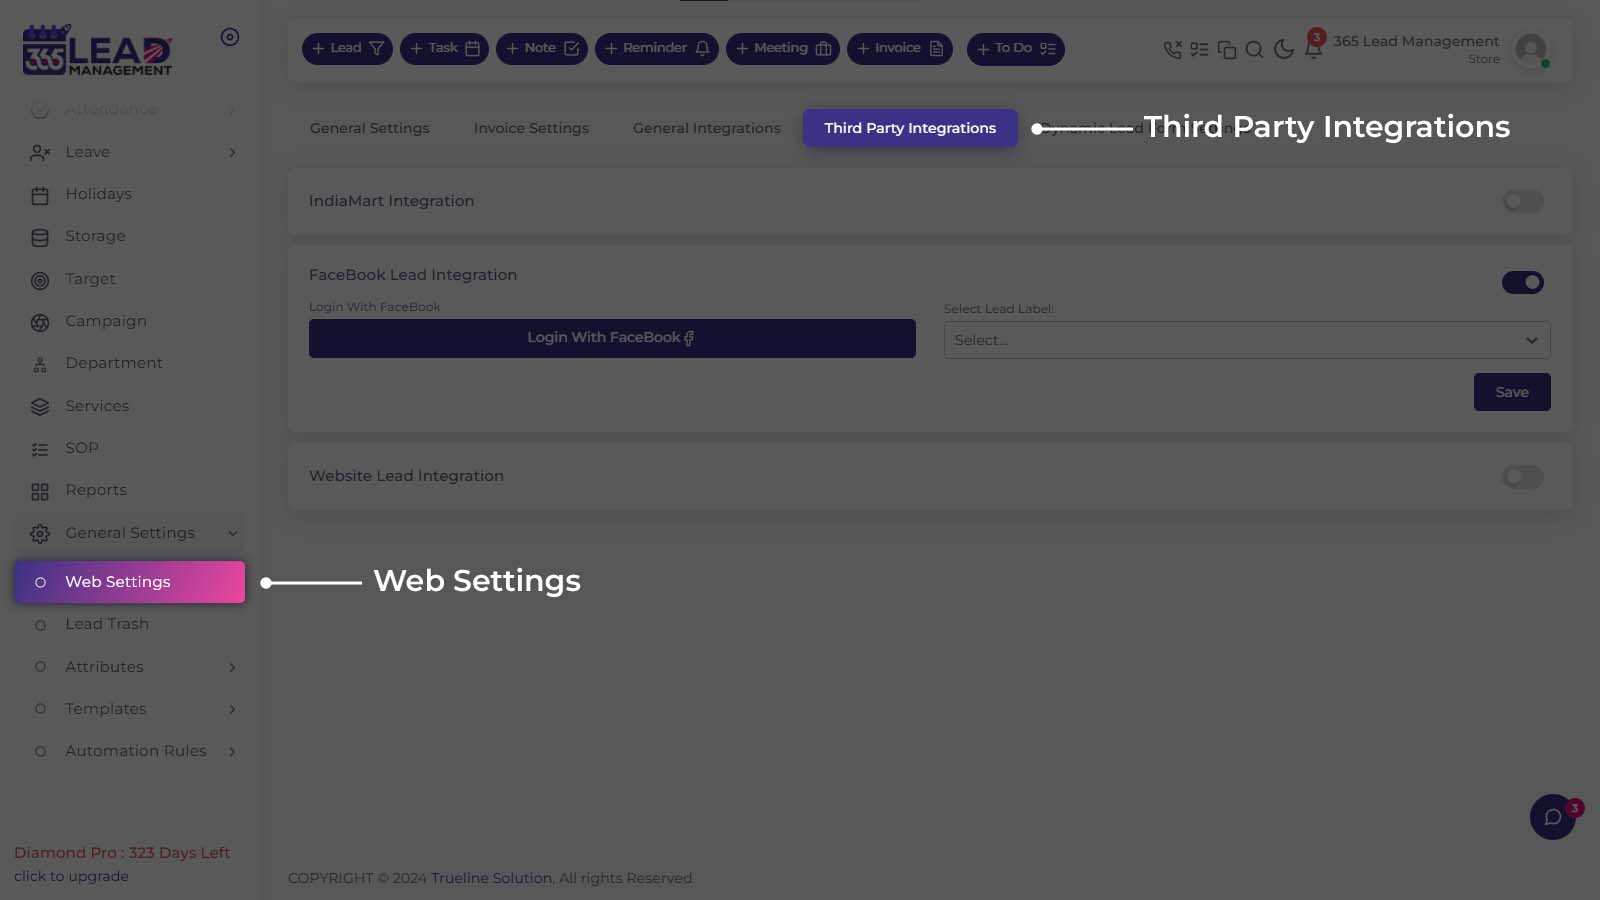
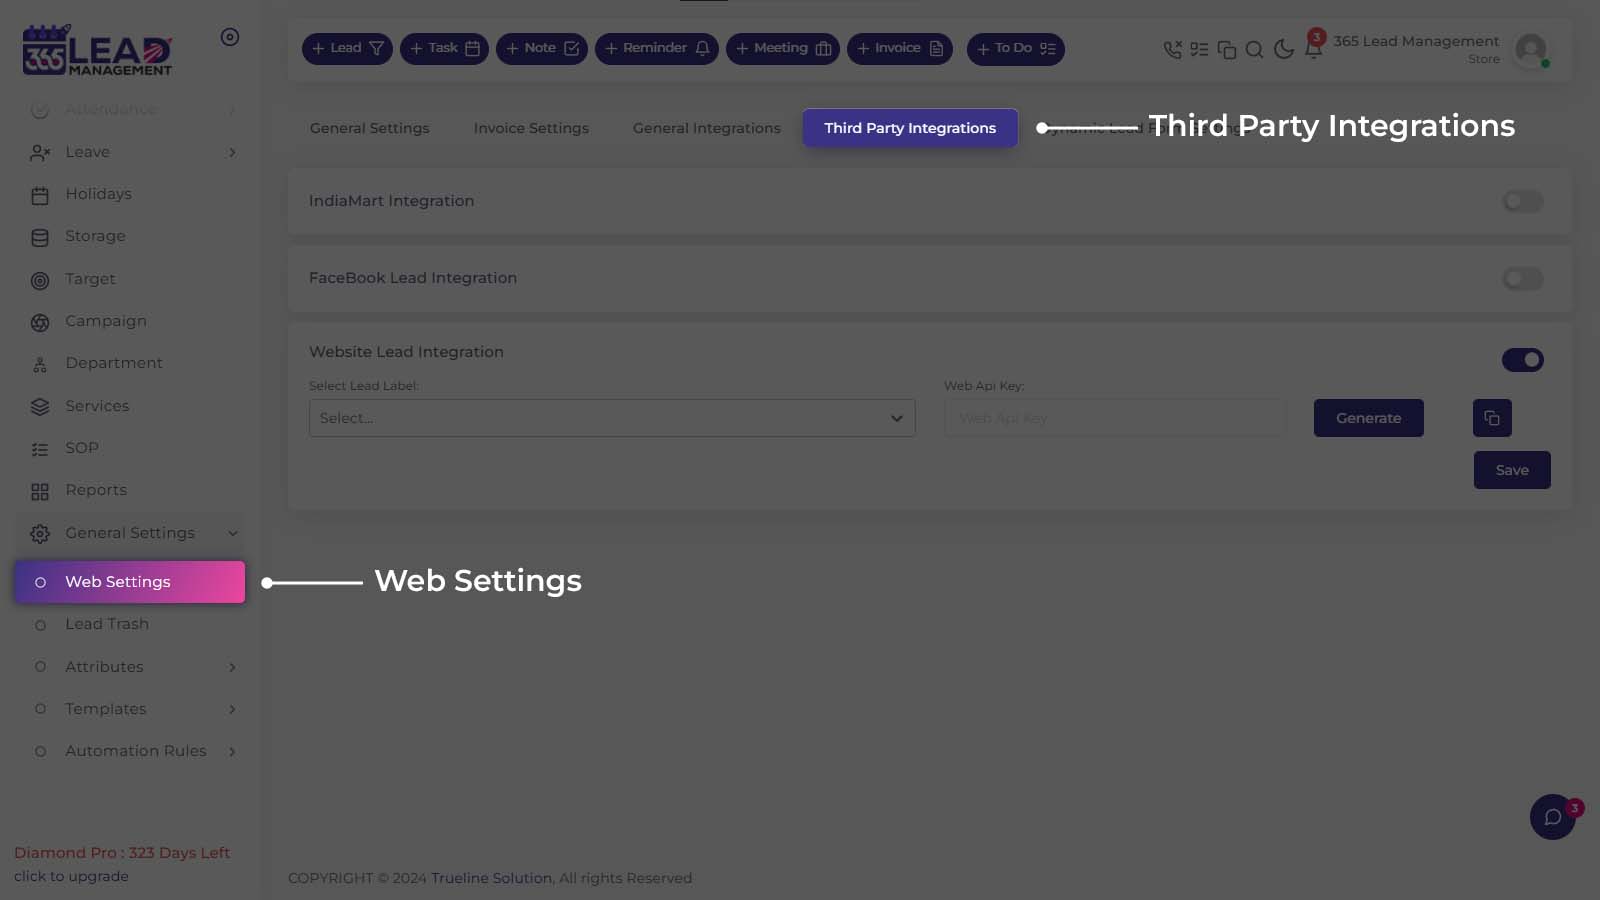
Go to General Setting >> Web Setting >> Third Party Integration >> Website Lead Setting >> Select Lead Label and Generate API
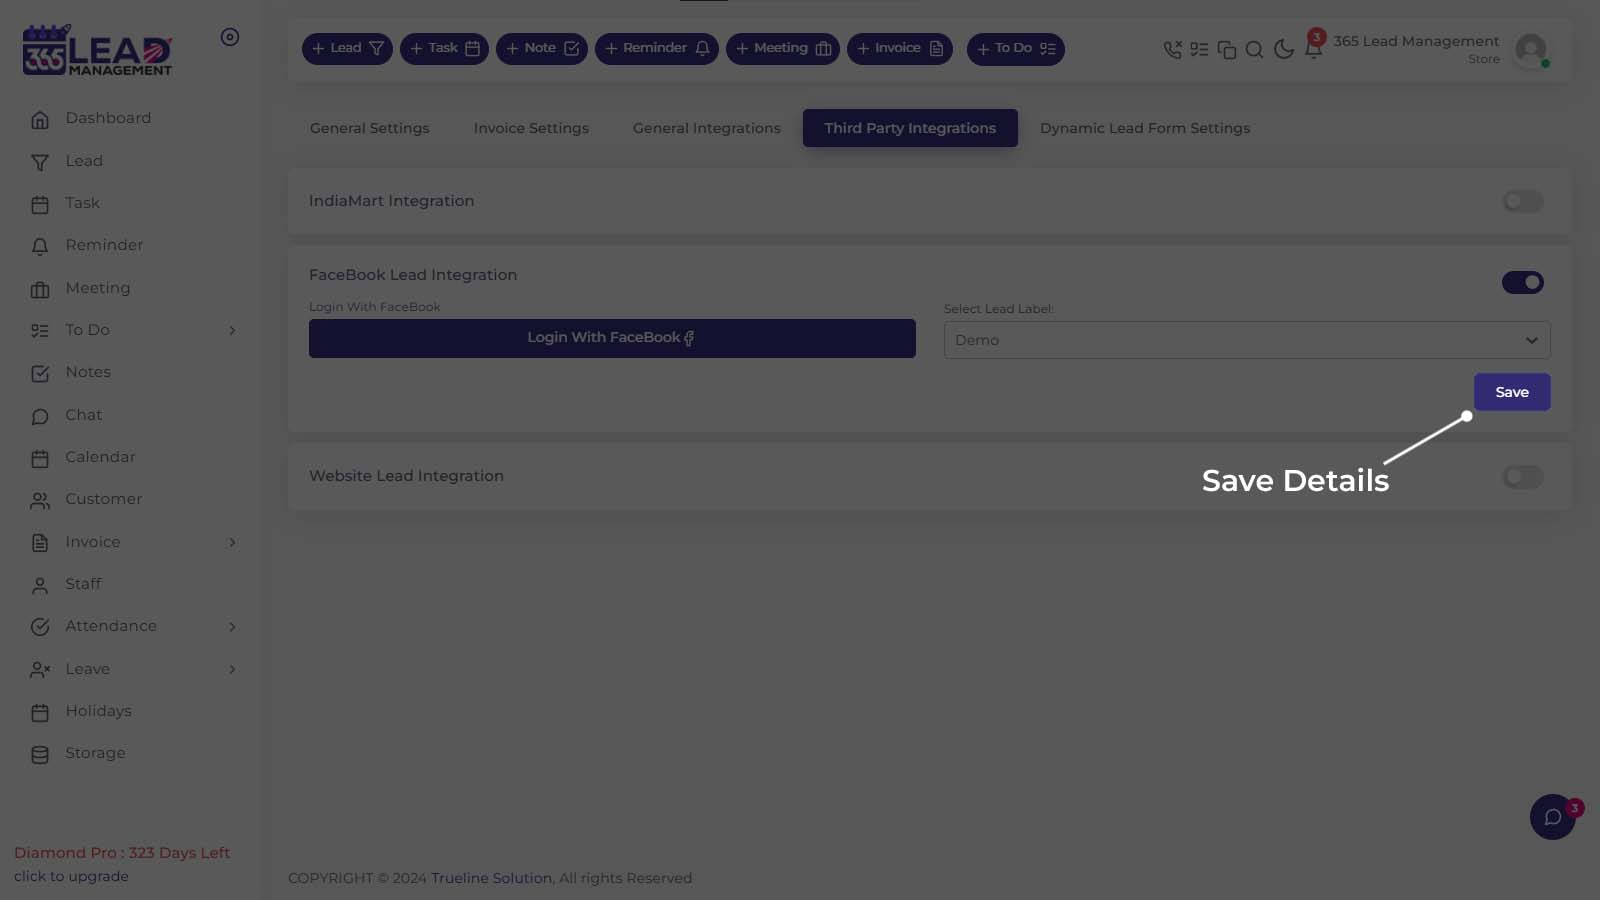
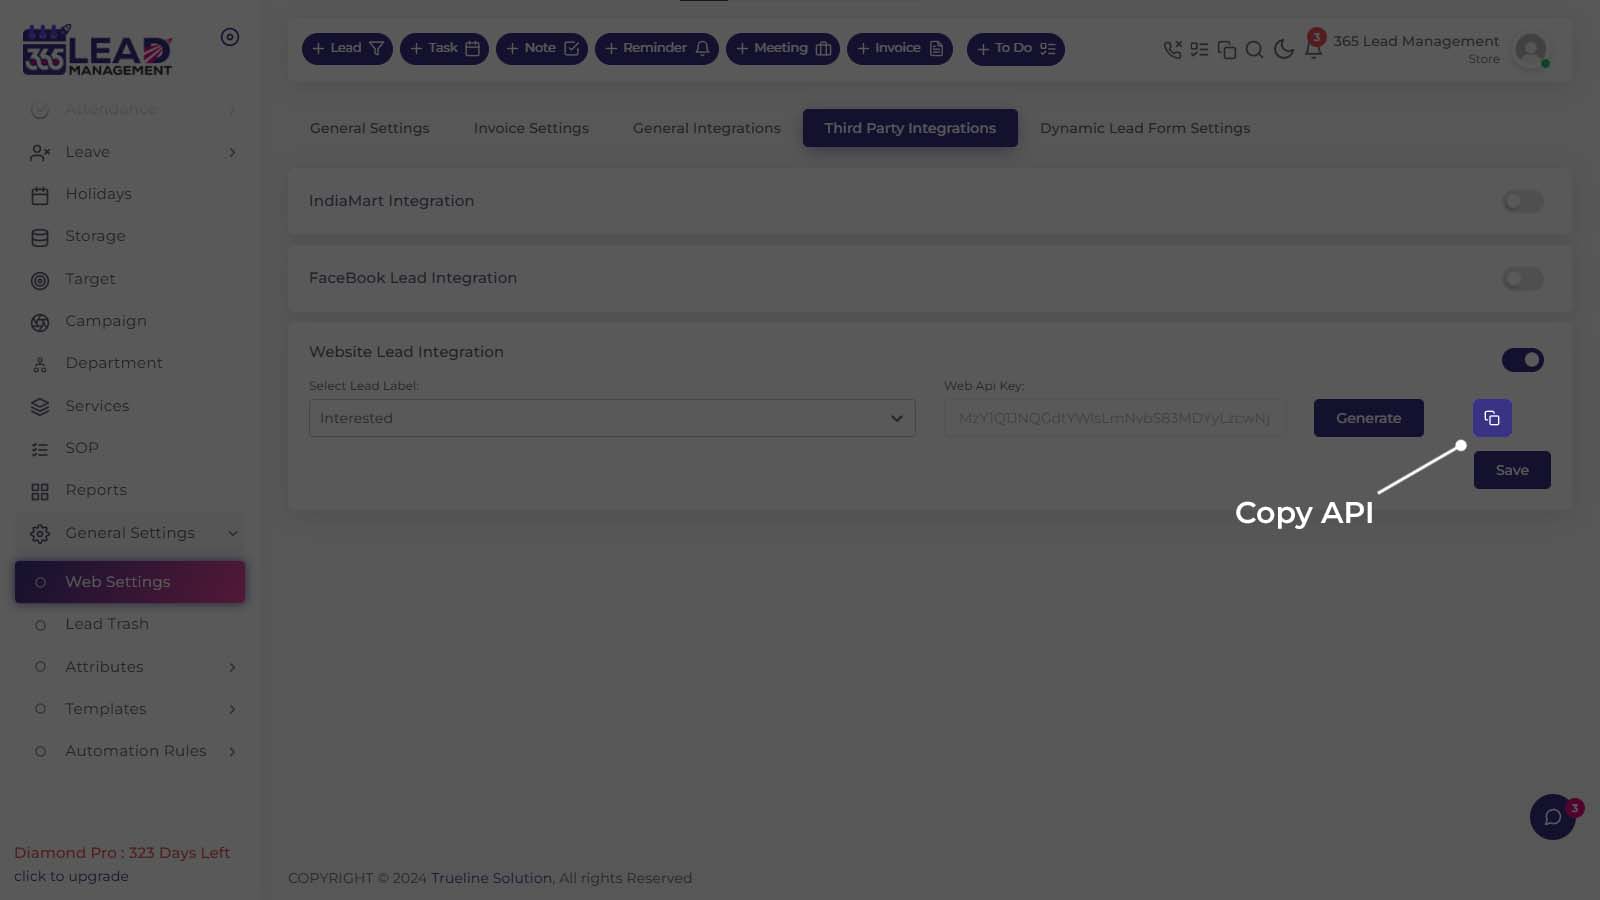
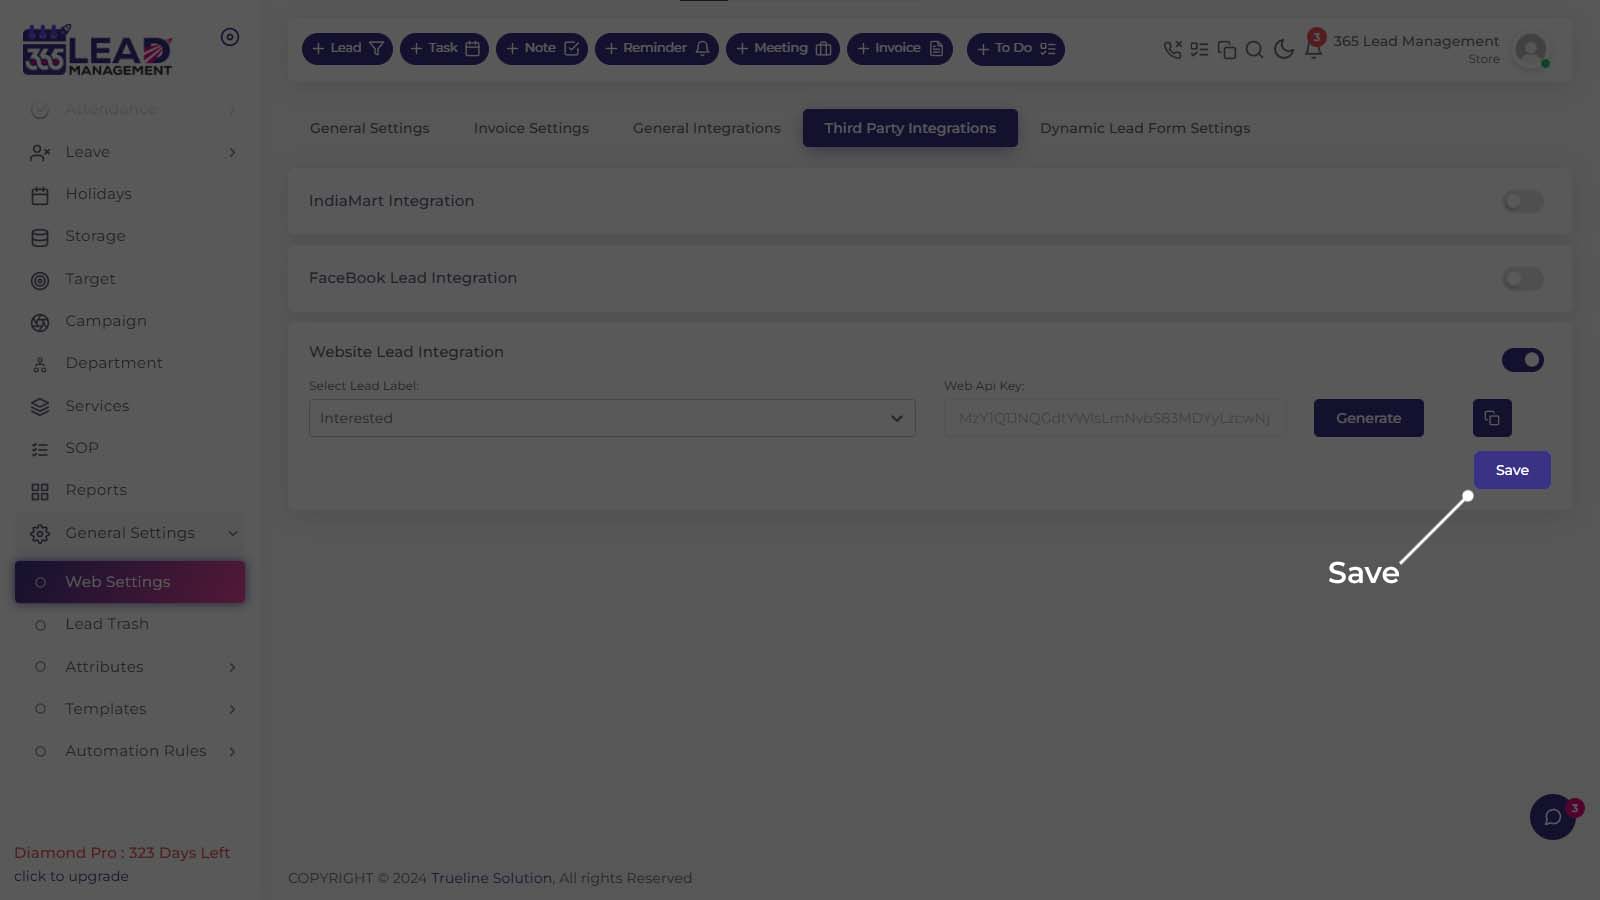
Step 3 : Copy API & Save
Go to General Setting >> Web Setting >> Third Party Integration >> Website Lead Setting >> Select Lead Label and Generate API >> Click On “Copy Icon” to Copy API Key >> Save
API Details
API
| POST | https://www.api.365leadmanagement.com/wpaddwebsiteleads |
Headers
| Authentication | Your API Key |
| Content – Type | Application / JSON |
Body (JSON)
customerName: New Lead from Web Site
customerEmail: Email
customerMobile: Mobile number
customerComment: Comment
Label: Your Label
Required Fields
- customerName
- customerMobile
Note: cutsomerMobile in country code include. Like, 919876543210
Step 1 : Generate CRM Key
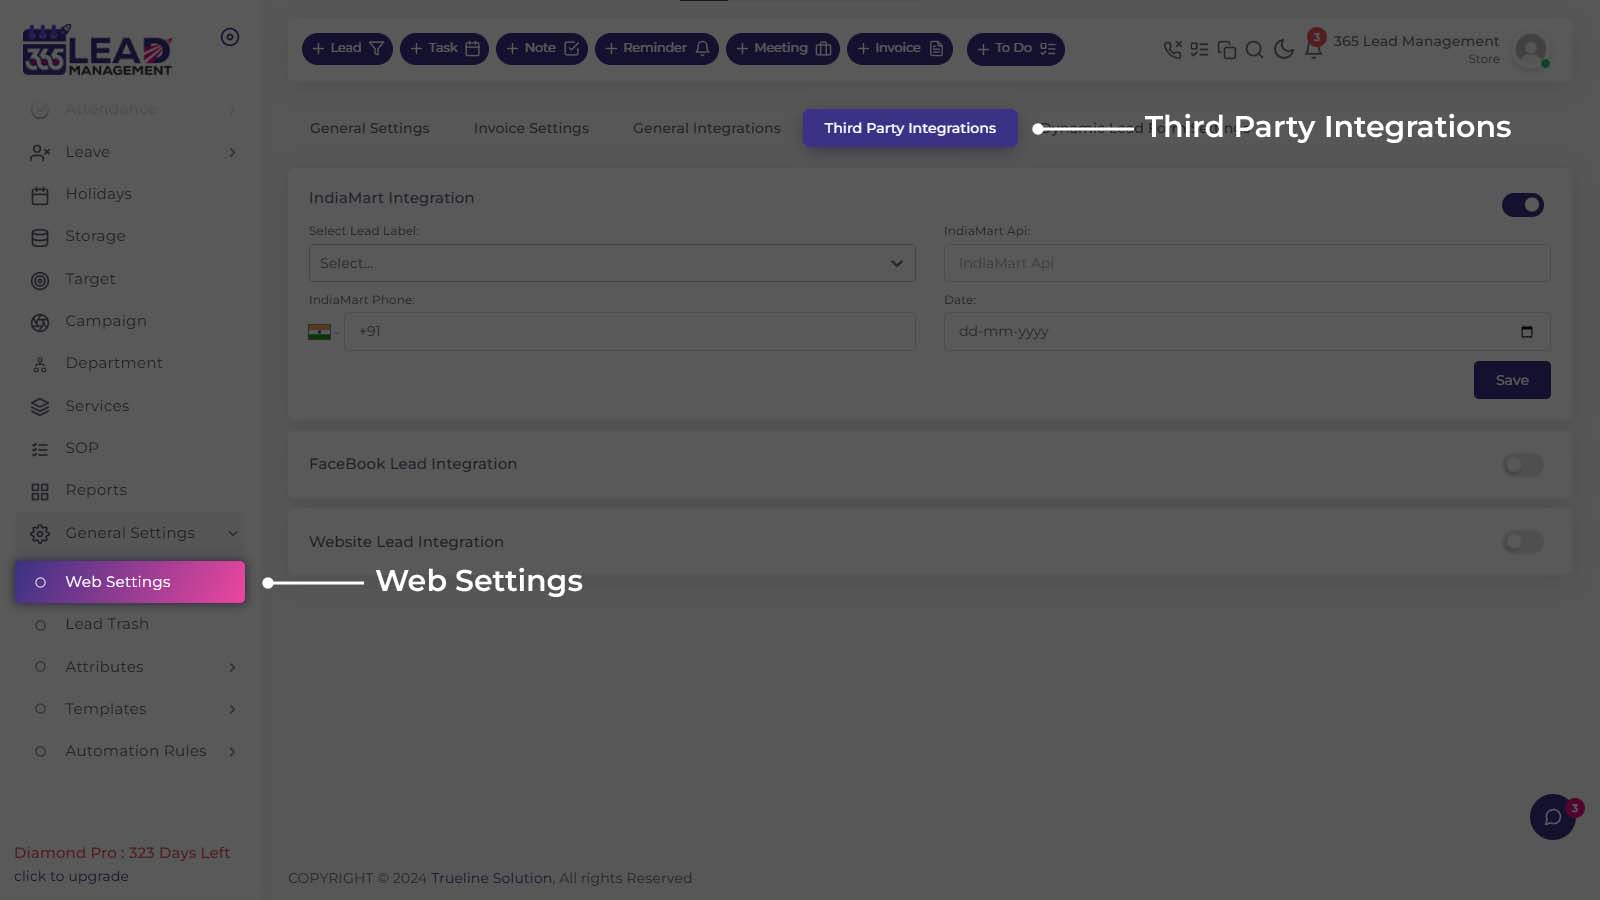
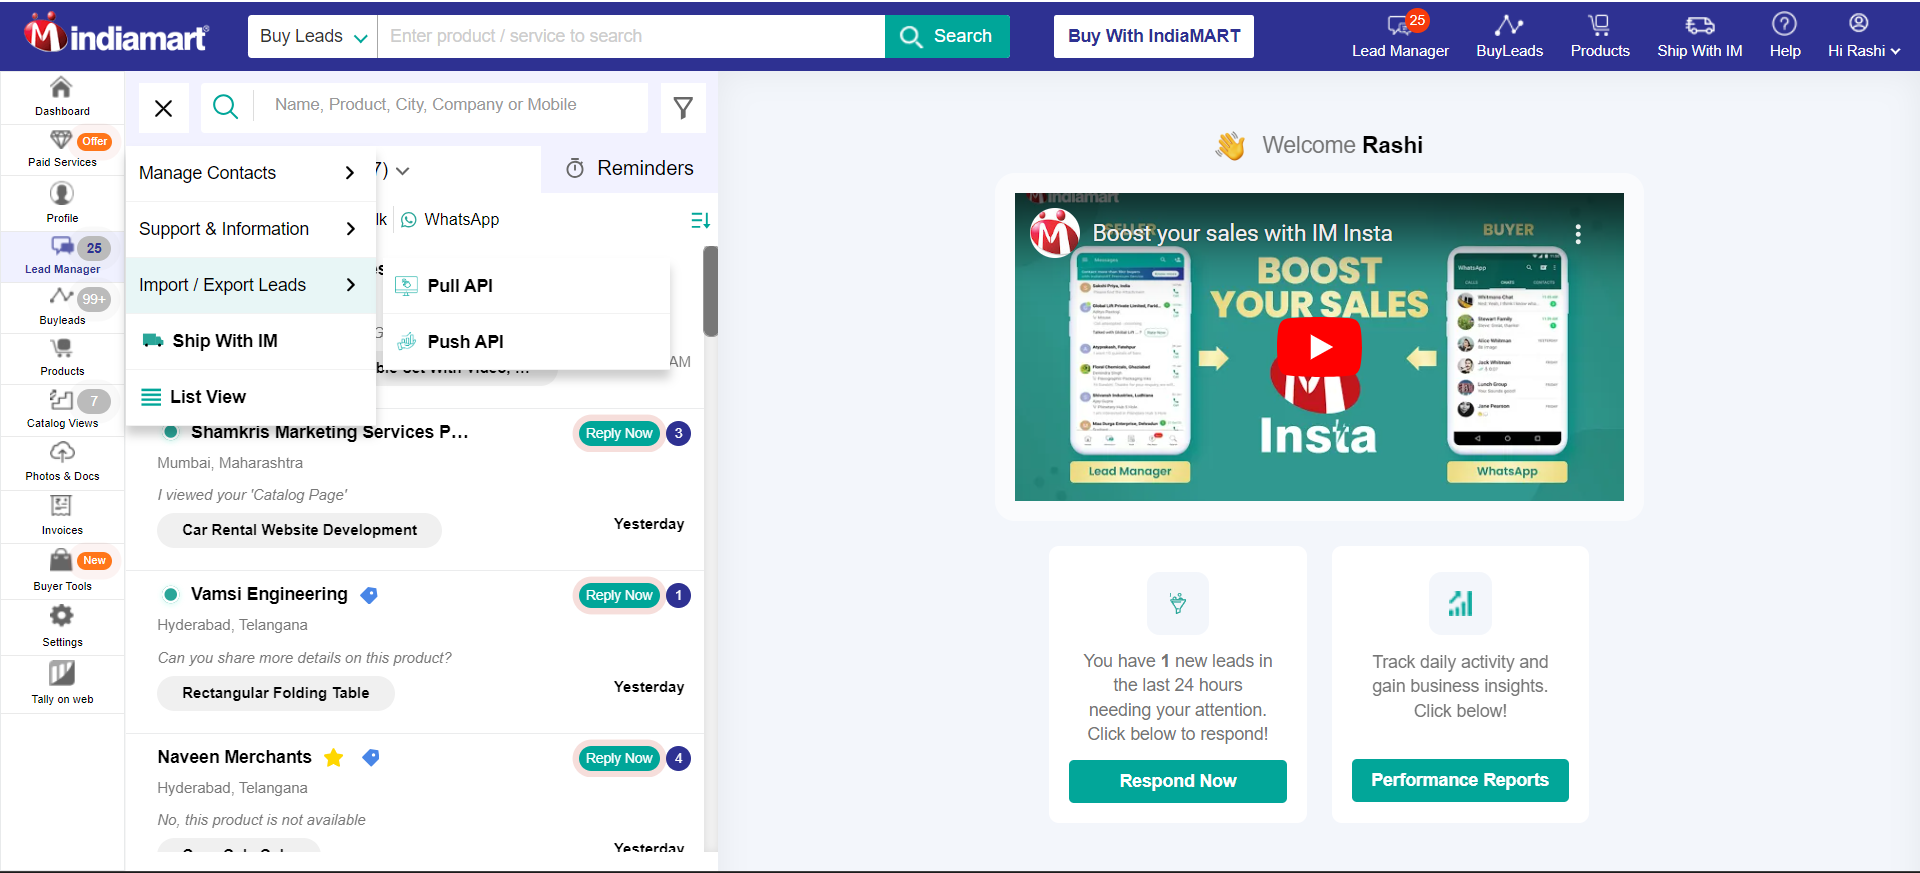
Visit seller.indiamart.com, login to your account, then go to the Lead Manager and under the three dots menu ( ⋮ ) click on CRM Integration.
Or you can also directly go to the Key Generation Page using the following link:
https://seller.indiamart.com/leadmanager/crmapi
Now, click on Generate Key. A unique CRM key will be generated and will also be sent to the registered email-id.
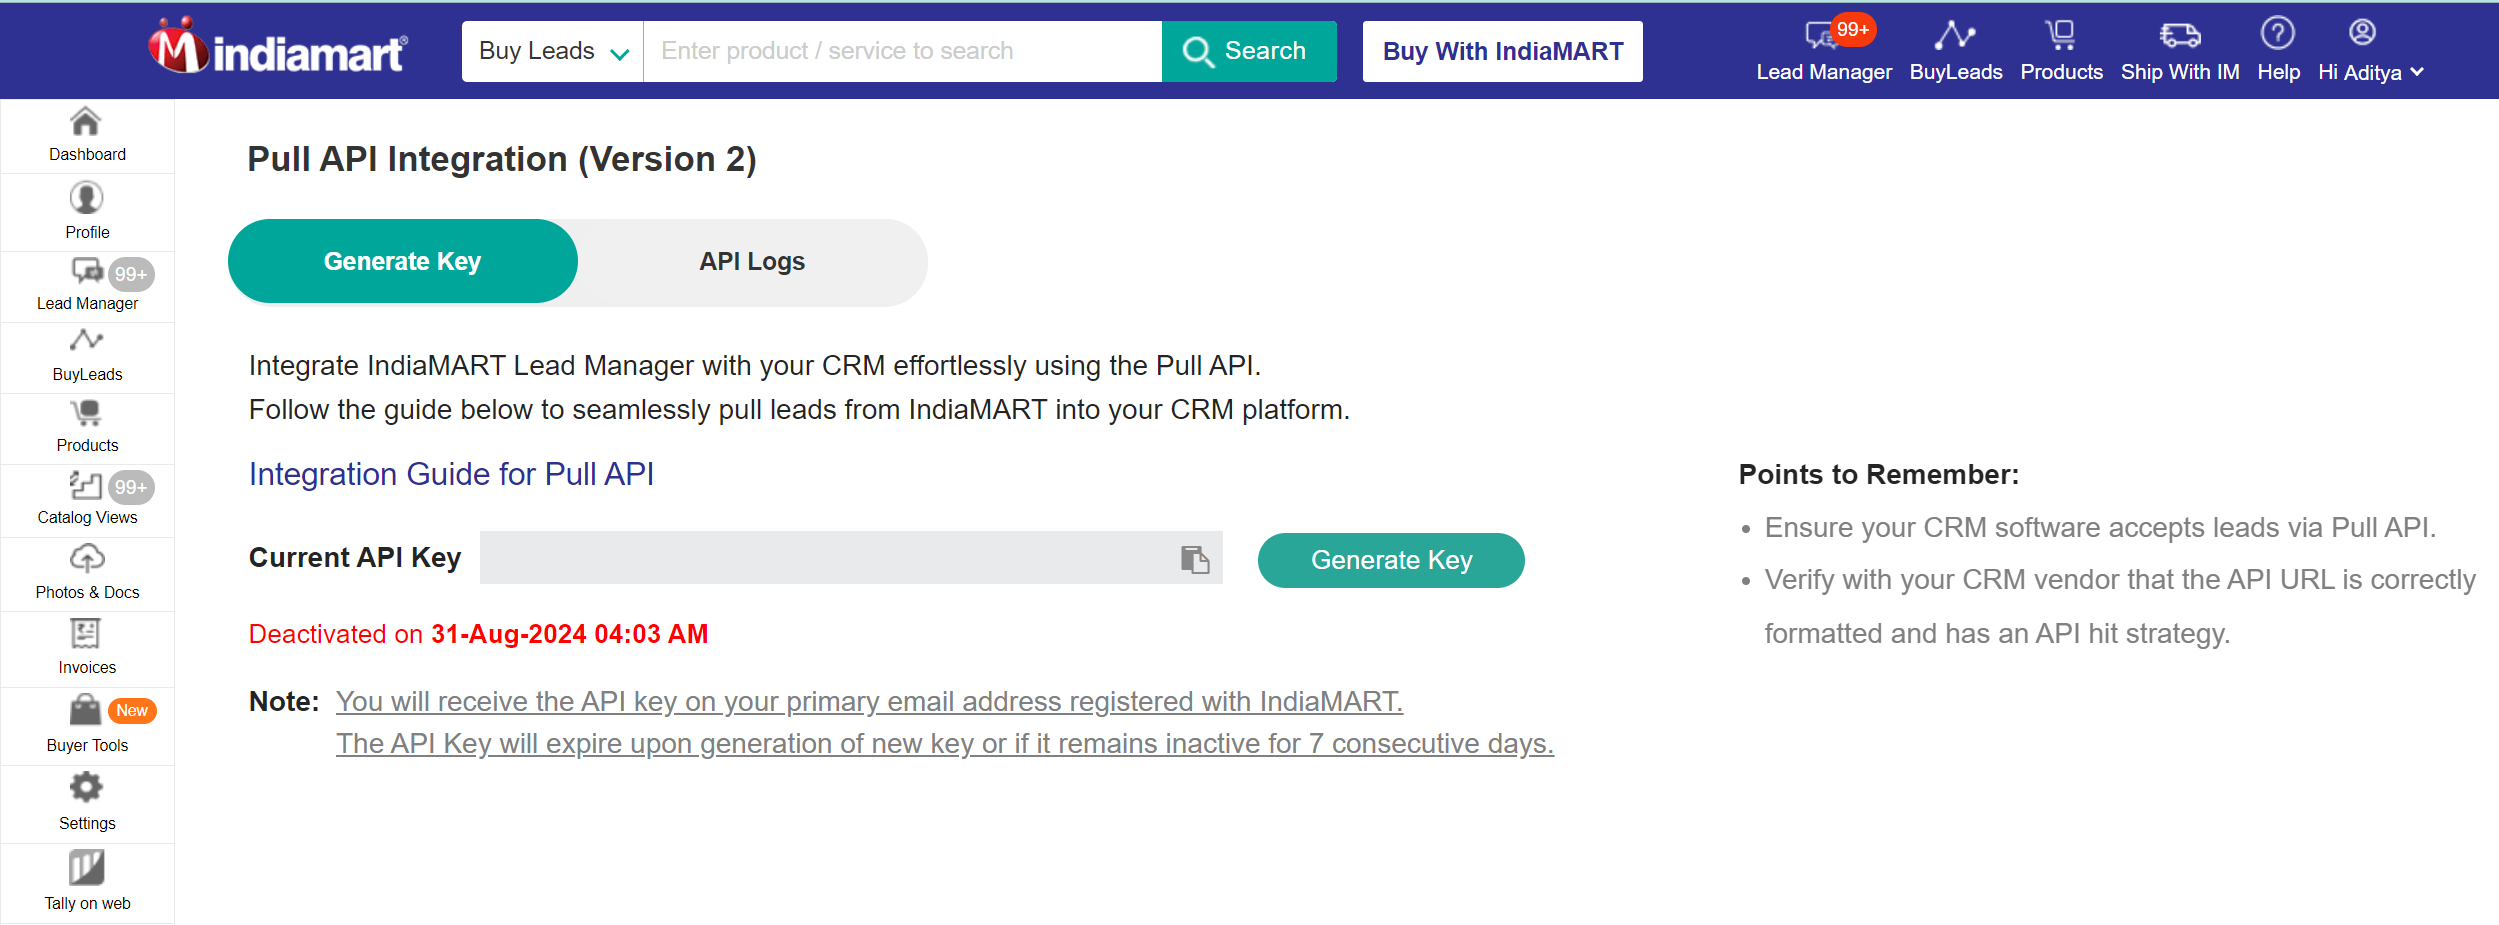
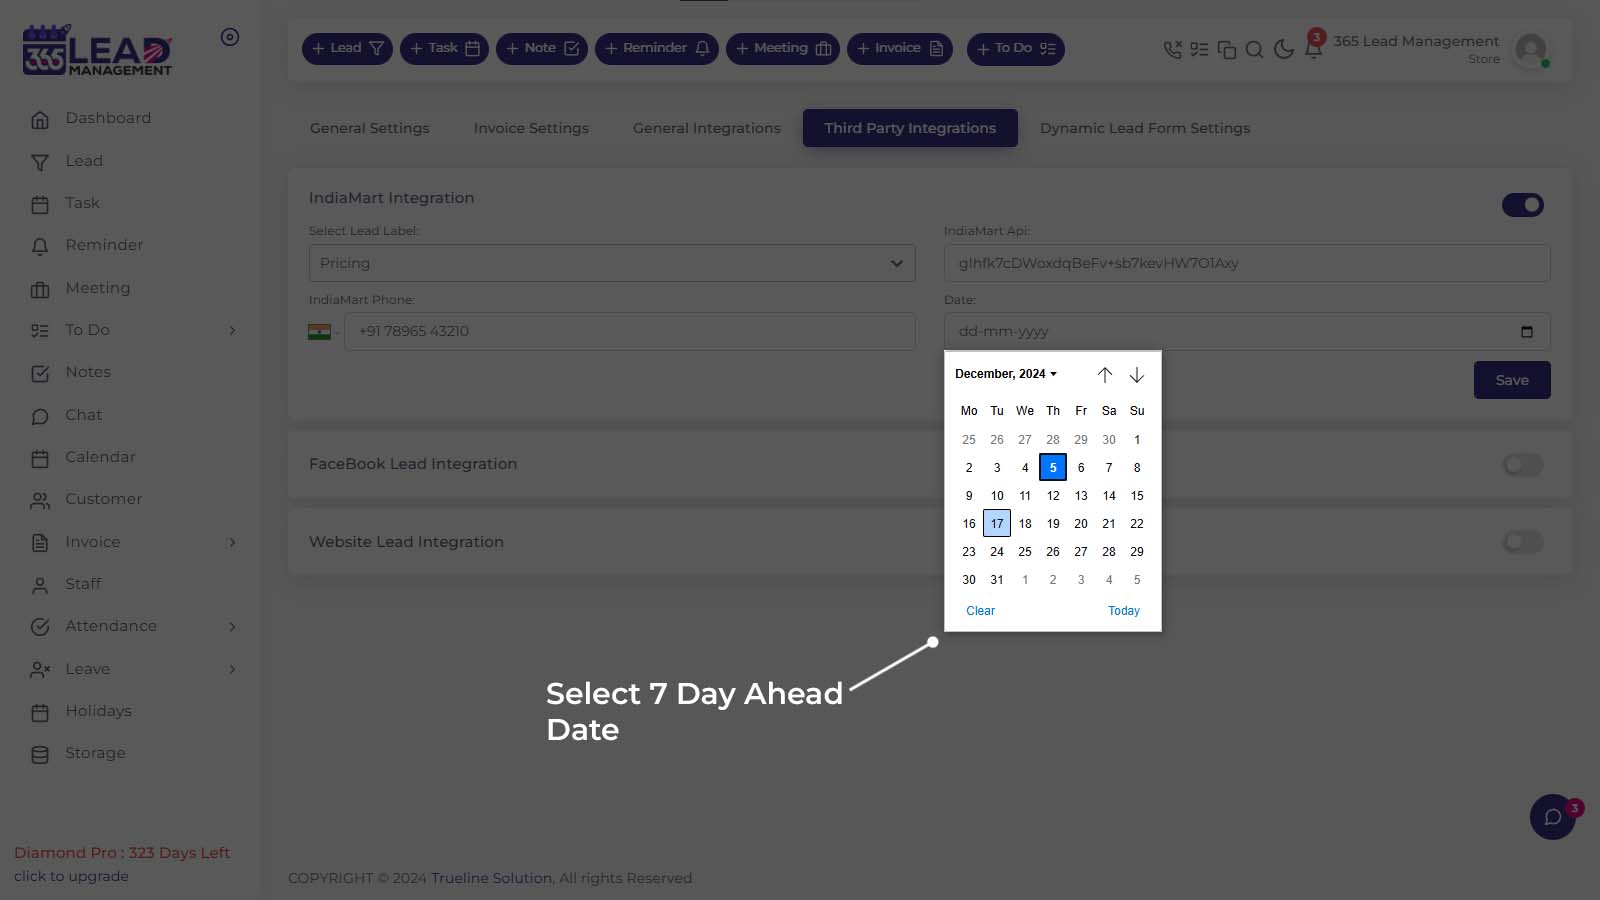
Note: In case you have already generated the CRM key, you can refer to the same from your email or check the key generation screen for your active CRM key. The CRM key will expire if it is not used in the last 7 days. On clicking ‘Generate Key’, a new key will be generated & the older one will expire (if any key was already generated earlier, it will stop working).
Step 1 : Craete GoogleAds Form
Note: The customer must have a Google Ads account to use this feature.
- Create GoogleAds Form
- Link Account
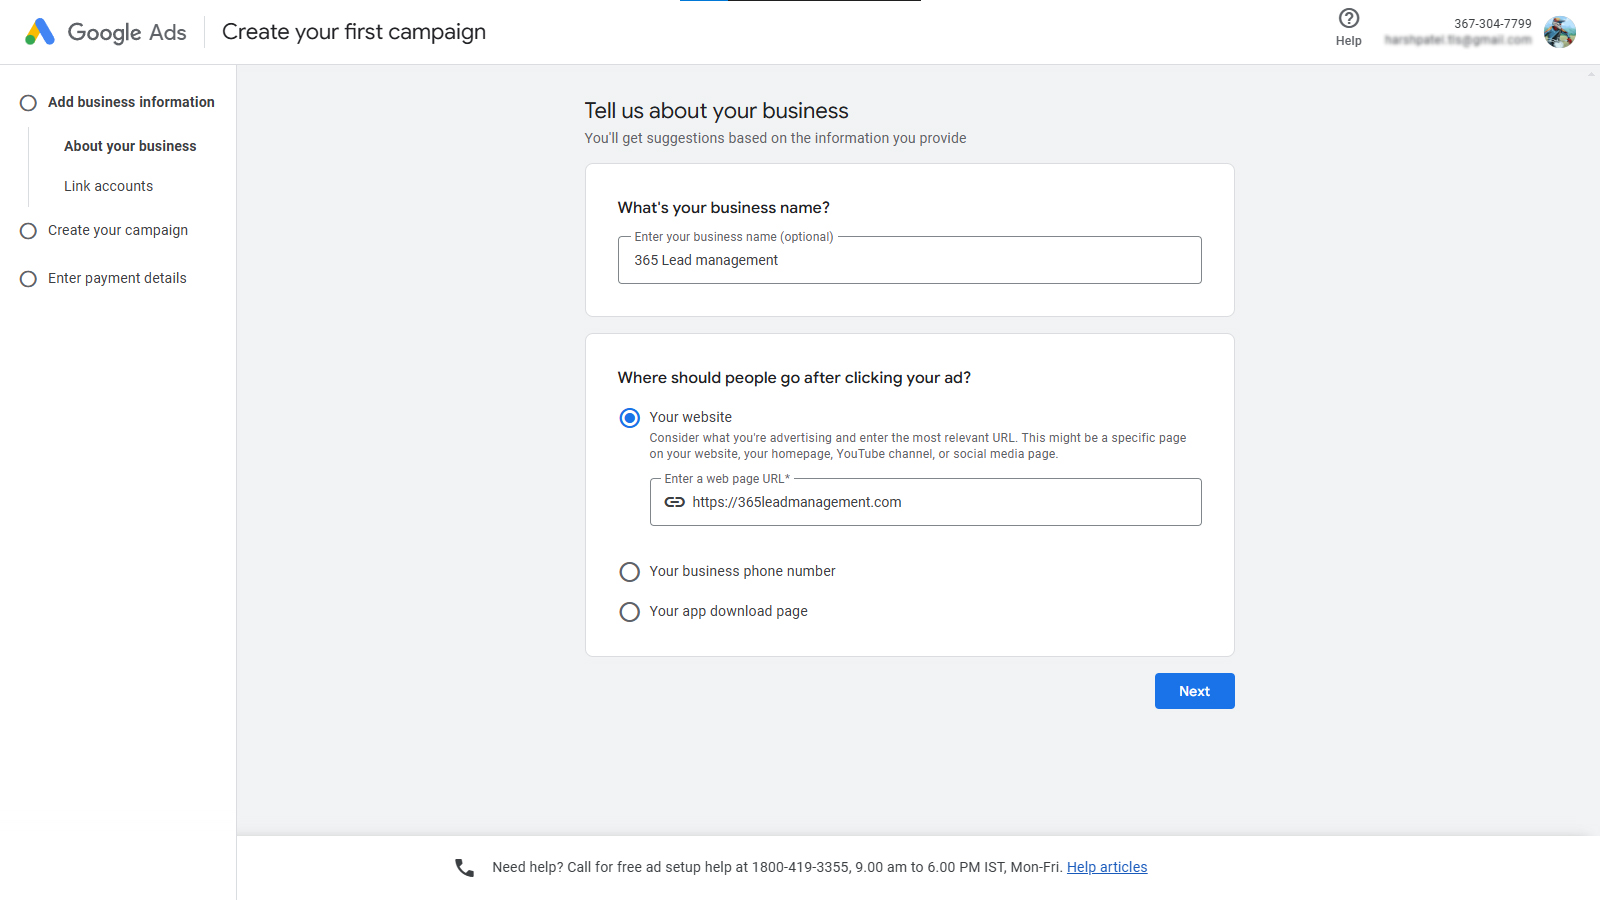
Step 2 : Create Campaign Ad

Go to the >> Add features to your ads to get more clicks
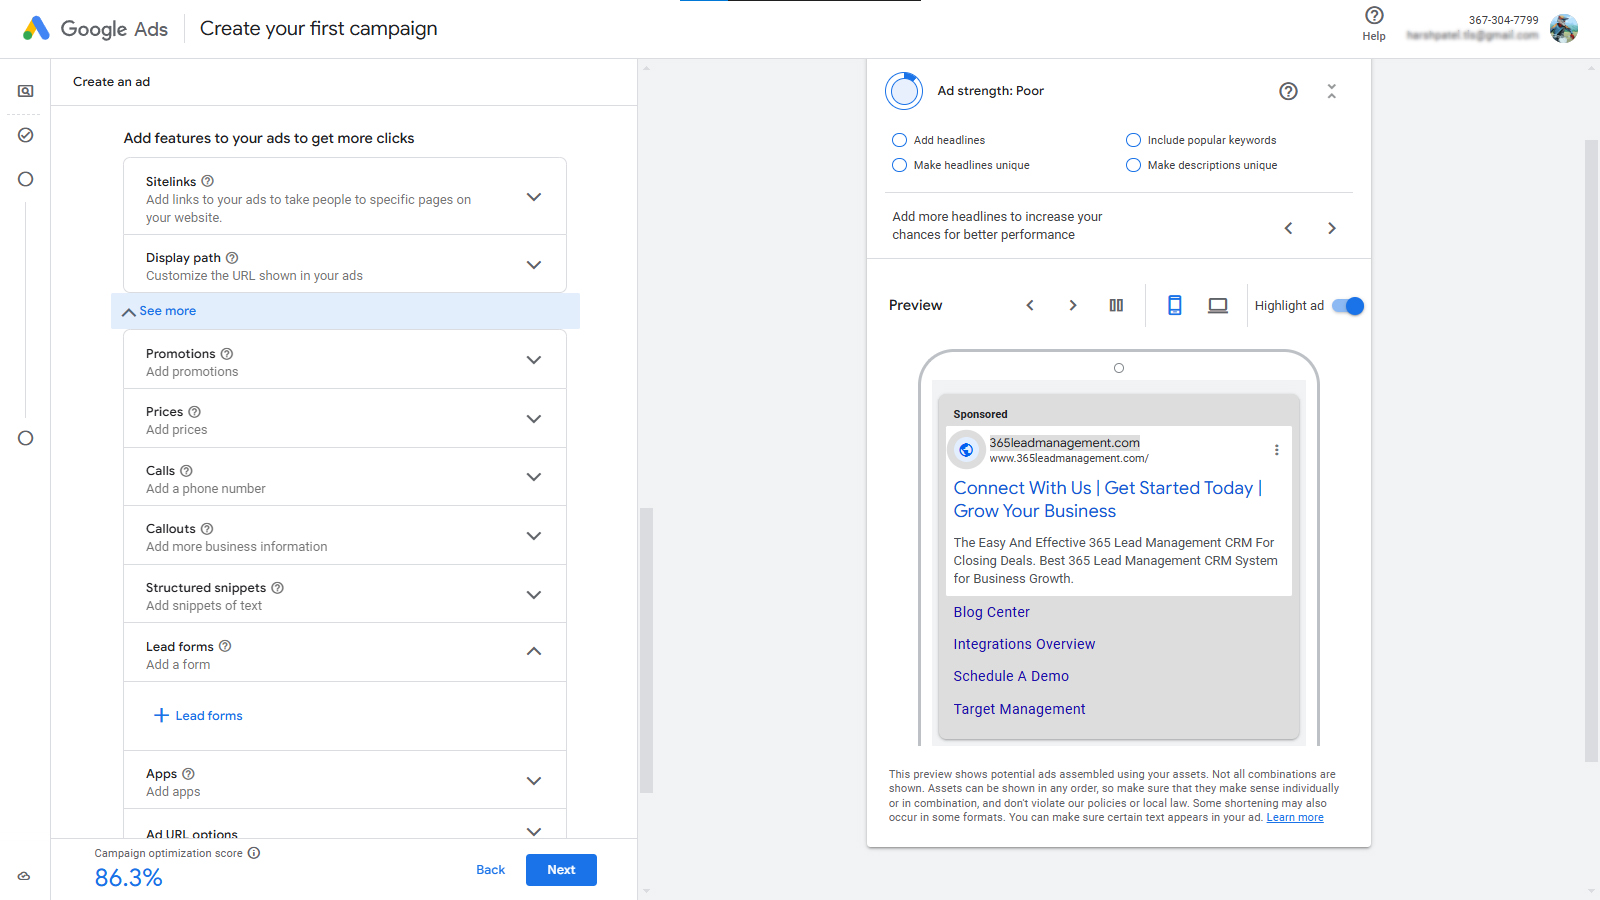
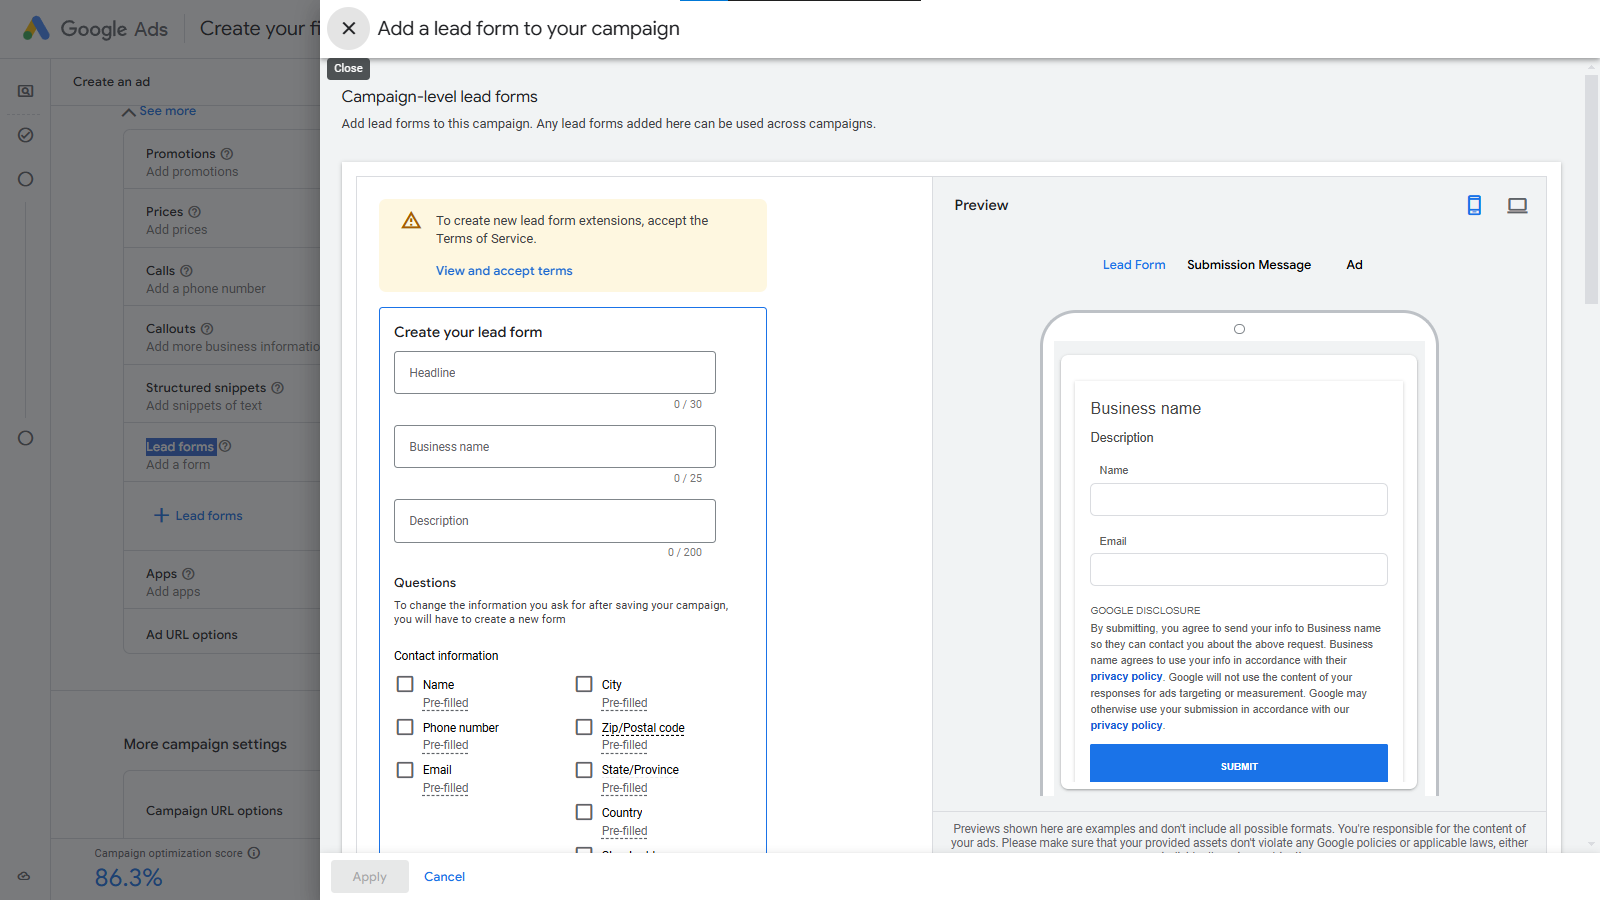
fill this form and at the end of form there is one option called as Lead Delivery option
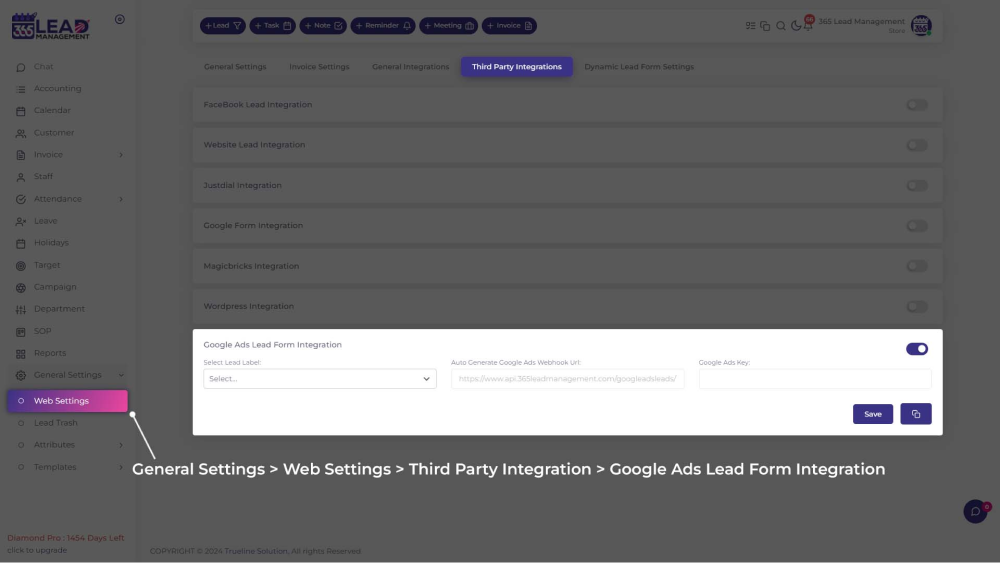
here add your 365 CRM Google Ads Lead Form url past here and key.
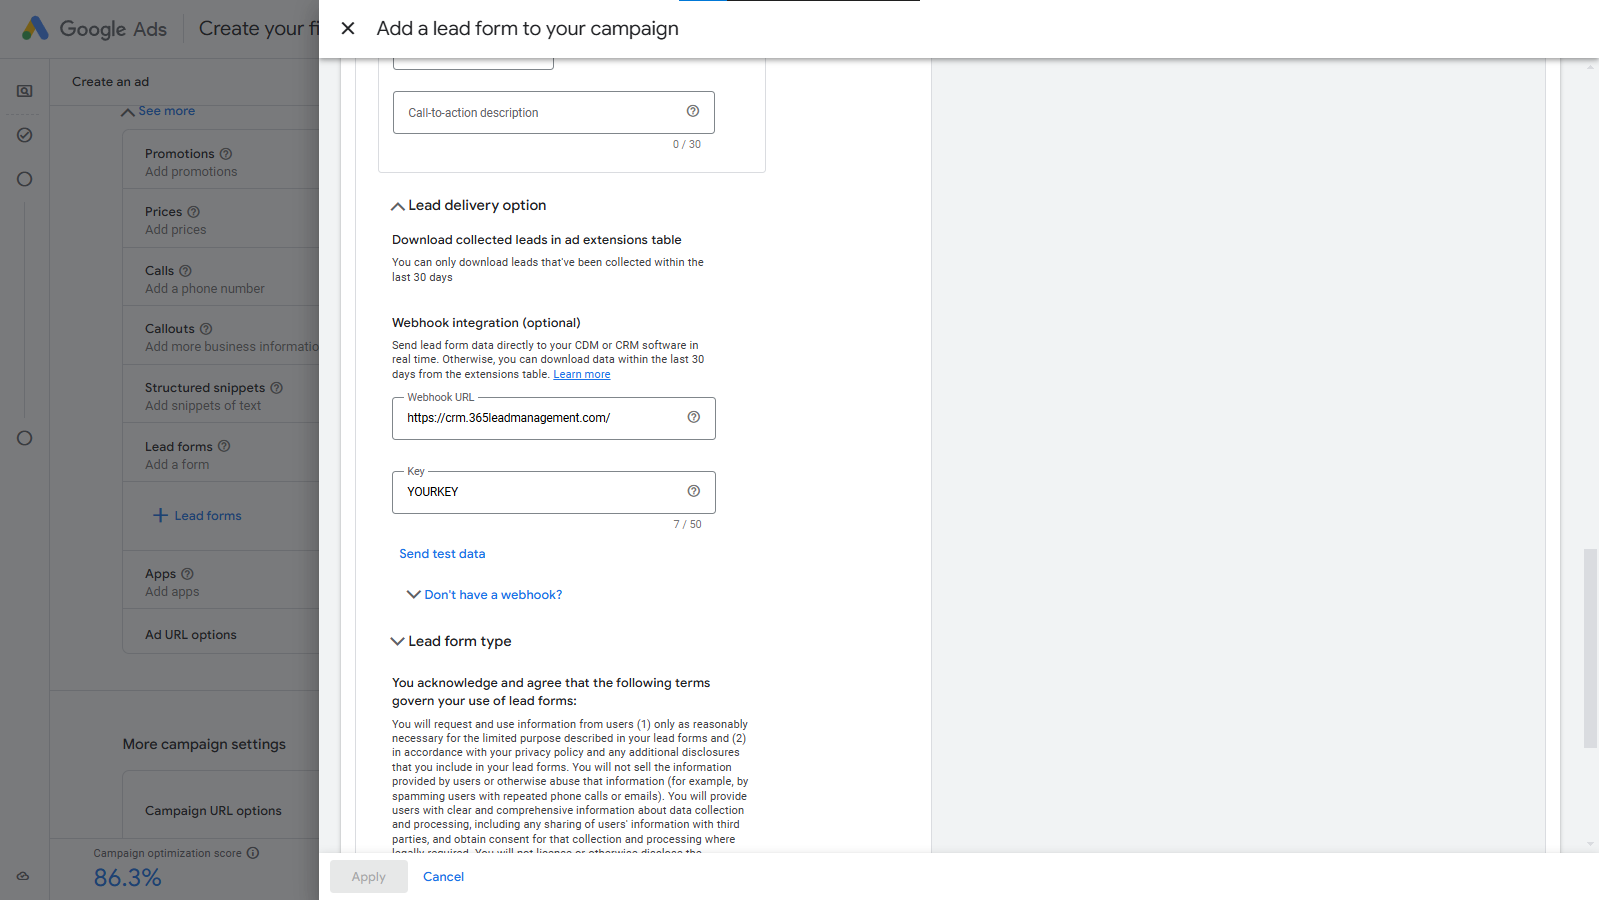
then create Your Campaign and test lead.
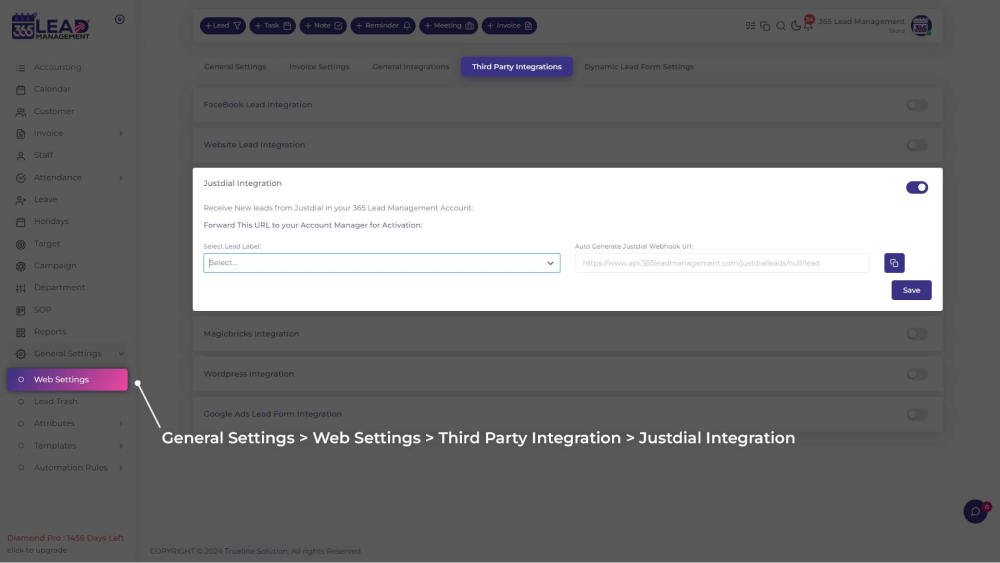
Step 1 : Just Dial Integration
Forward Instructions to your Account Manager
Connect to 365 Lead Management by submitting a request directly to your JustDial account manager. Please forward them the following instructions:
- Please send my JustDial leads to 365 Lead Management CRM. The steps to do so are as follows:
- My unique Webhook URL to send leads to: https://www.api.365leadmanagement.com/justdialleads/< Your KEY>/lead
Note: You can get the full URL from your 365 Lead Management account.
- My unique Webhook URL to send leads to: https://www.api.365leadmanagement.com/justdialleads/< Your KEY>/lead
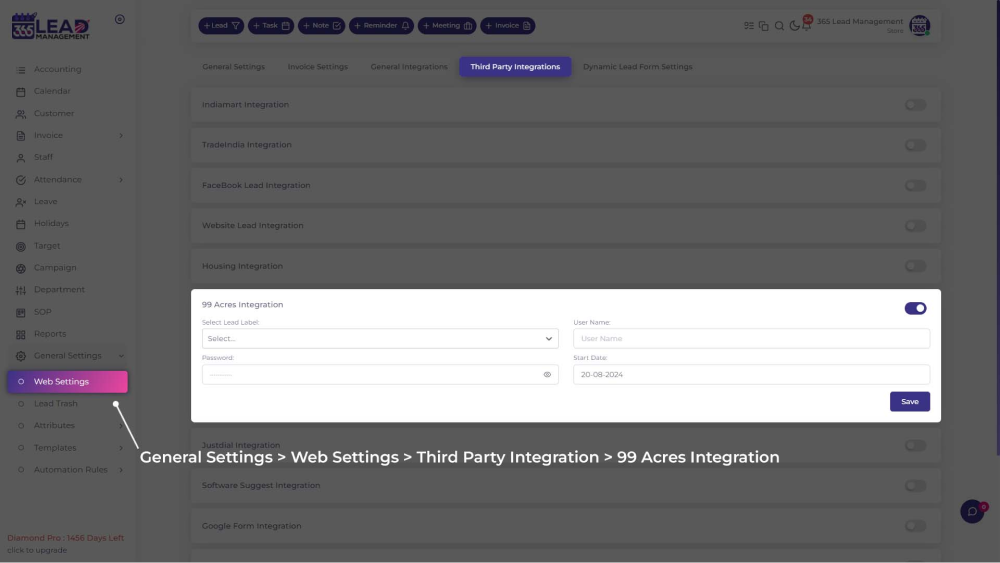
Go to General Setting >> Web Setting >> Third Party Integration >> Just Dial Integration
Step 1 : Magicbricks Integration
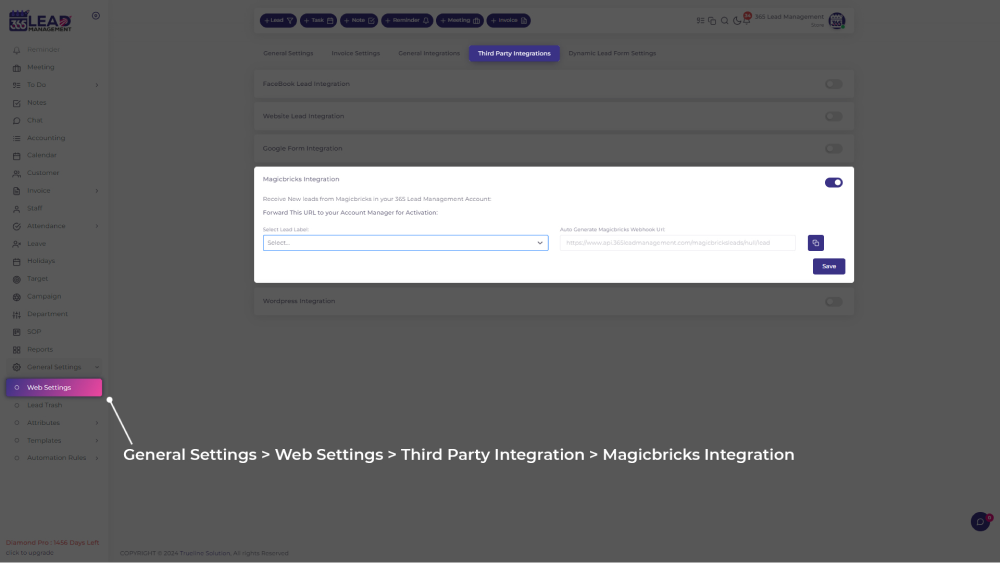
Connect to 365 Lead Management by submitting a request directly to your MagicBricks account manager.
Please forward them the following instructions, and replace YOUR_USER_ID with your MagicBricks login ID:
- Please send my MagicBricks leads to 365 Lead Management CRM.
- My MagicBricks login ID is: YOUR_USER_ID
The required information is as follows:
- CET or non-CET client: Non-CET
- CRM service provider name: 365 Lead Management CRM
- Integration type: PUSH integration
- Working Endpoint: https://www.api.365leadmanagement.com/magicbricksleads/<YOUR KEY>/lead
Note: You can get the full URL from your 365 Lead Management account. - Sample URL: https://www.api.365leadmanagement.com/magicbricksleads/<YOUR KEY>/lead
Note: You can get the full URL from your 365 Lead Management account. - API Key: Not needed, this is included in the custom webhook URL above
- URL Parameters: Not needed, this is included in the custom webhook URL above
curl Example: curl --location 'https://api.365Leadmanagement.com/magicbricksleads/<365CRM-USER-KEY>/lead?name=leadname&mobile=919988774444&email=abc%40gmail.com&remark=remark&project=project%20name&pid=property%20id&api_key=63d5af44737e48cf9167ab5346352d7a091023054407&source=4&responsetype=lead&account=ravidarji13%40gmail.com'
Go to General Setting >> Web Setting >> Third Party Integration >> Magicbricks Integration
Step 1 : Log in to TradeIndia
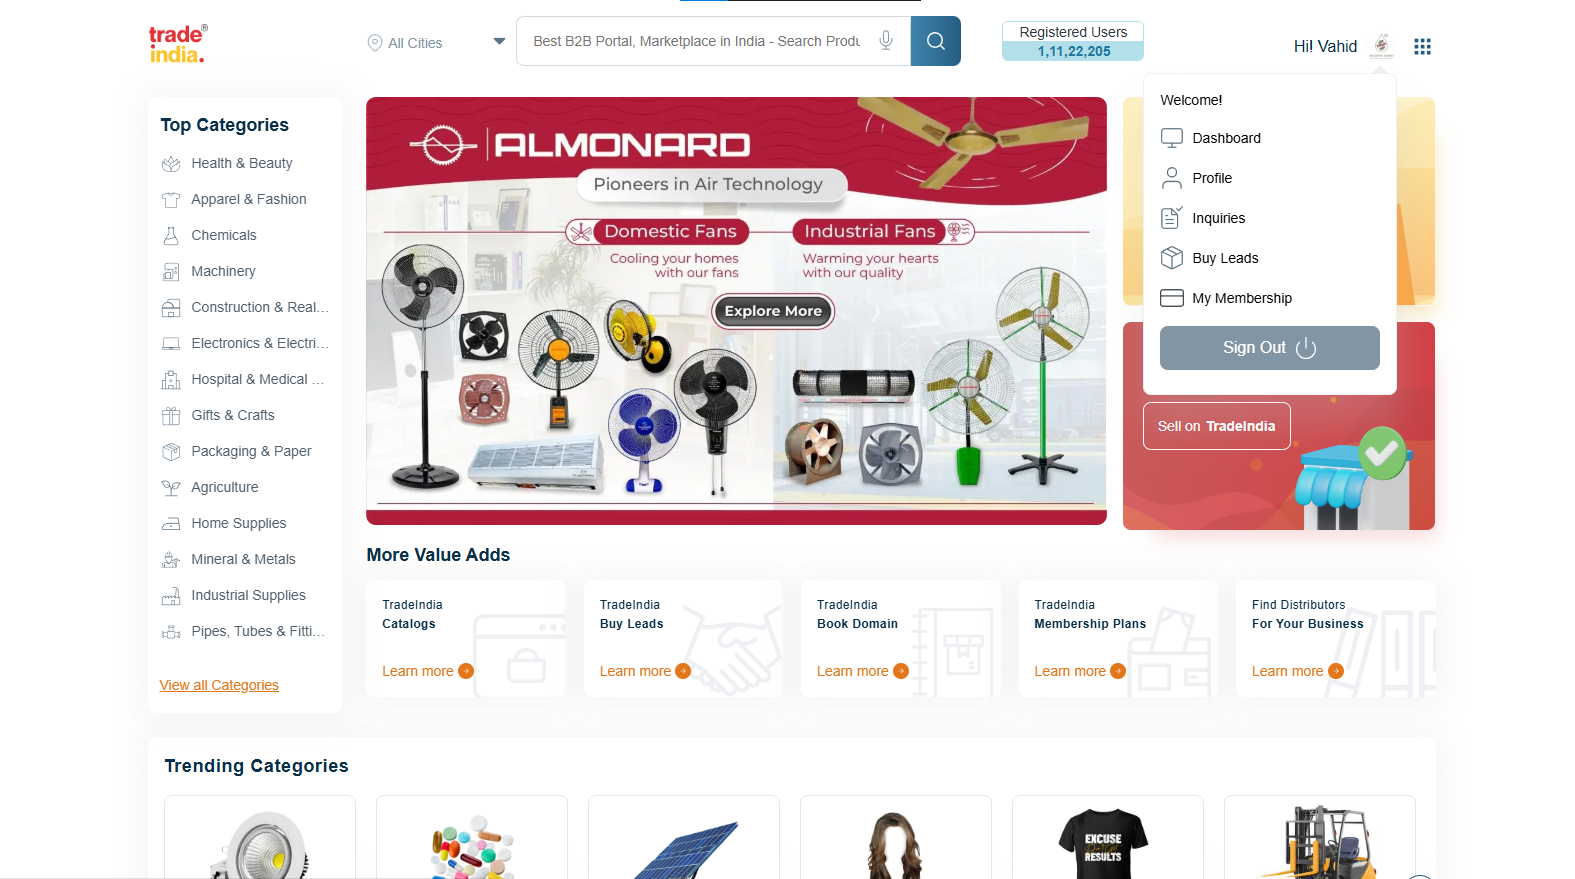
- Visit www.tradeindia.com and log in to your account.
- Click on your profile icon at the top-right corner.
- From the dropdown menu, select Inquiries under My Account.
Step 2 : Access Leads and Inquiries
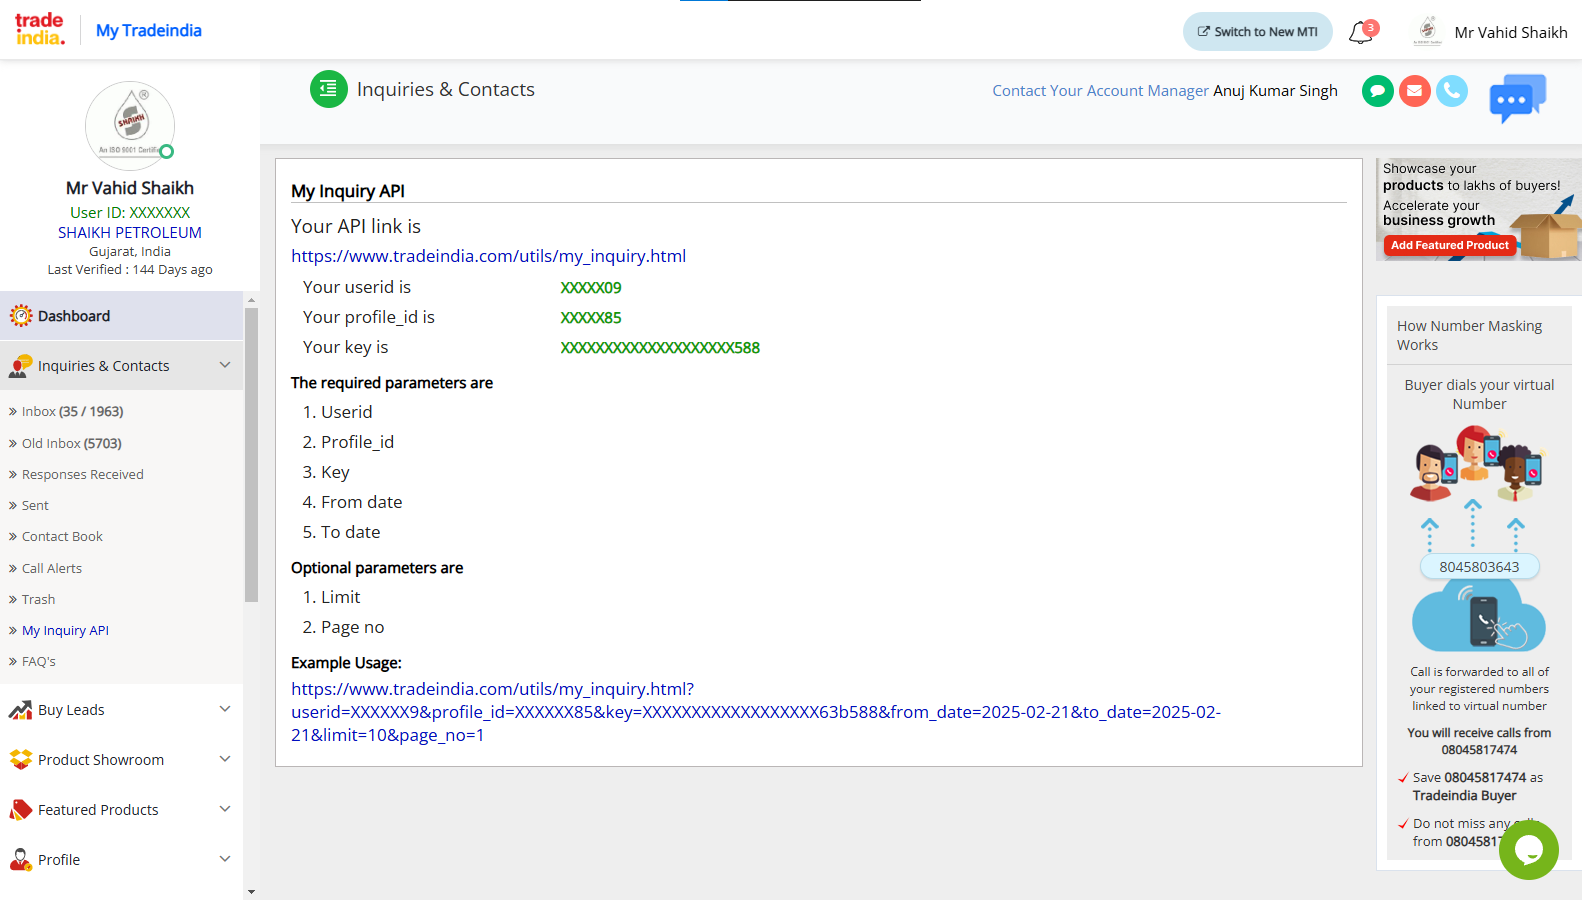
- See the "Leads and Inquiries" menu – It will automatically expand by default.
- Select "My Inquiry API" to access the API integration section.
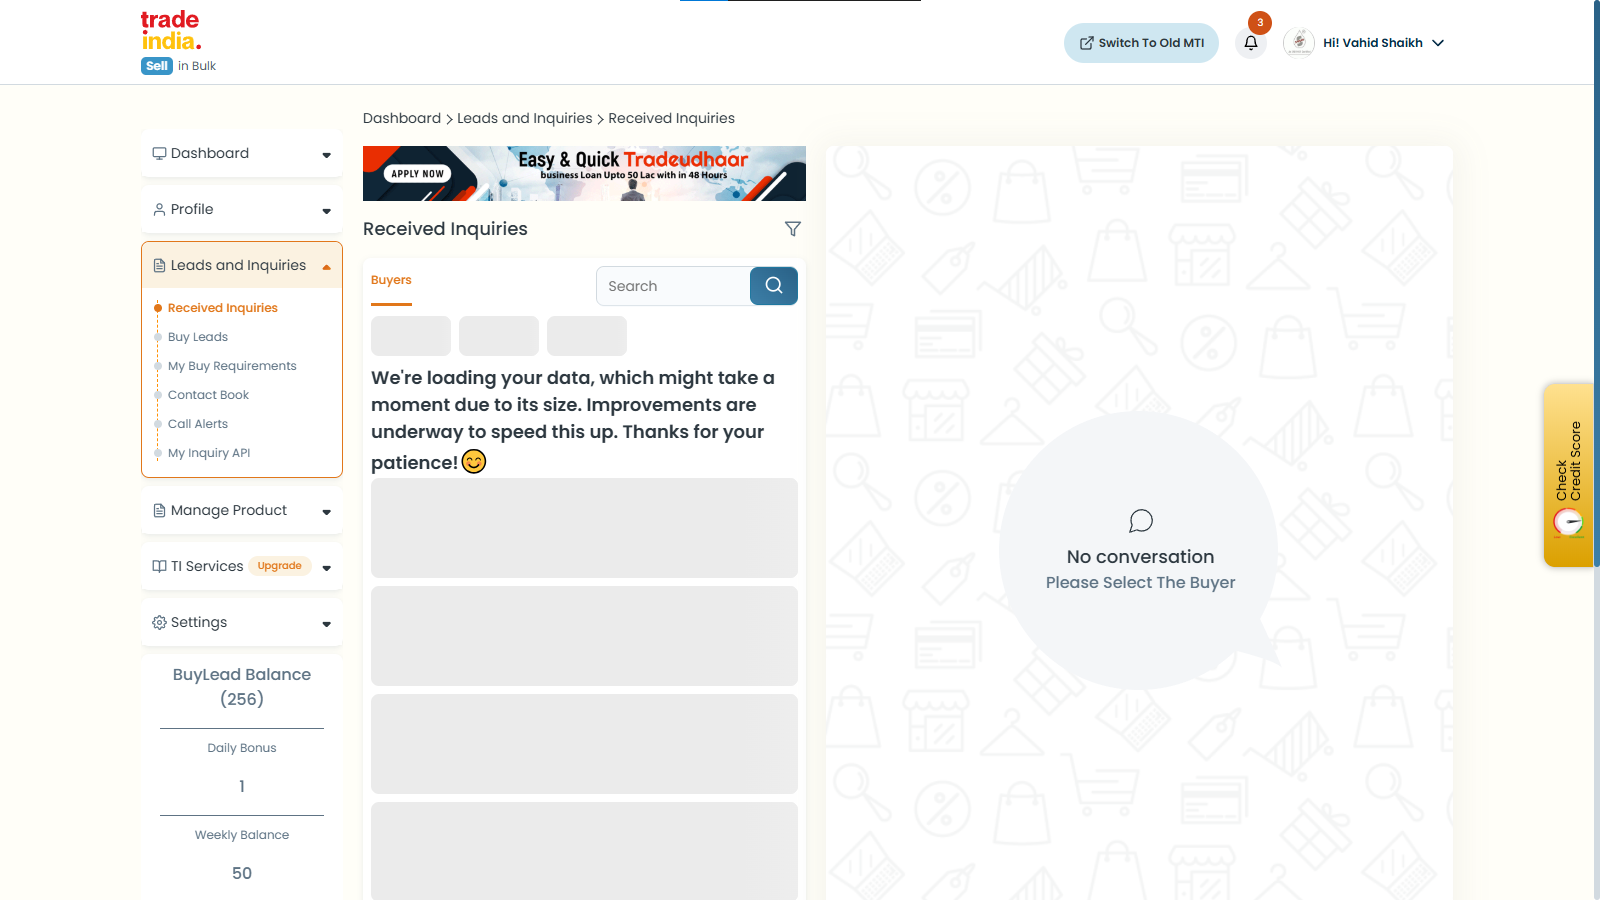
Copy the following details from the My Inquiry API section:
- User ID
- Profile ID
- API Key
These details will be used to connect TradeIndia with 365 CRM.
Step 3 : TradeIndia Integration in 365 CRM
- Log in to your 365 Lead Management CRM account.
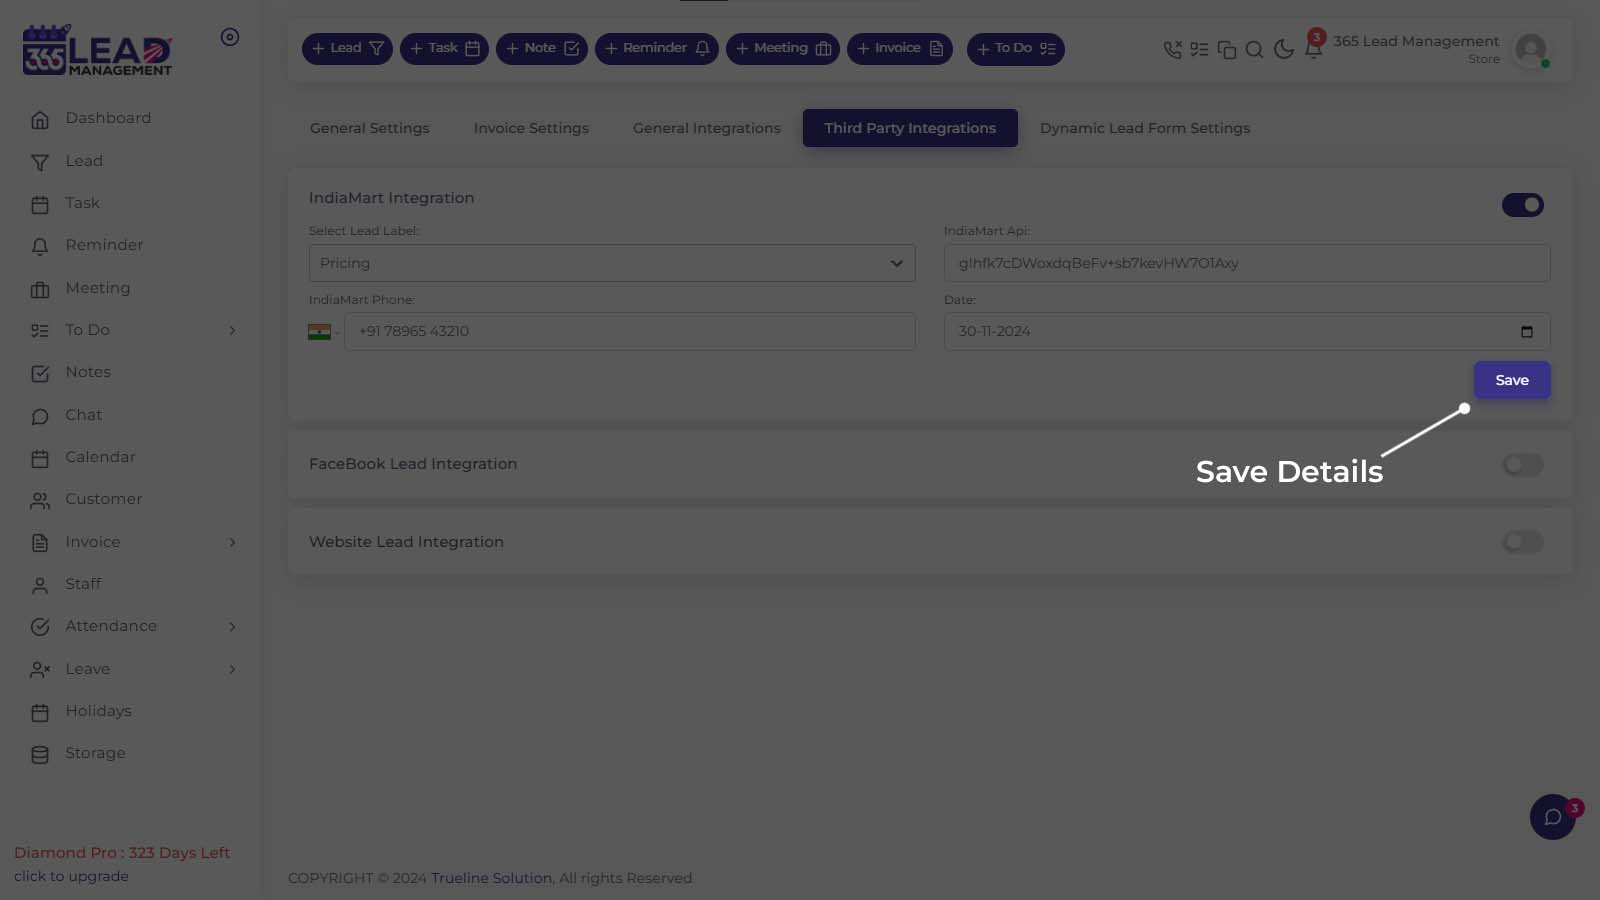
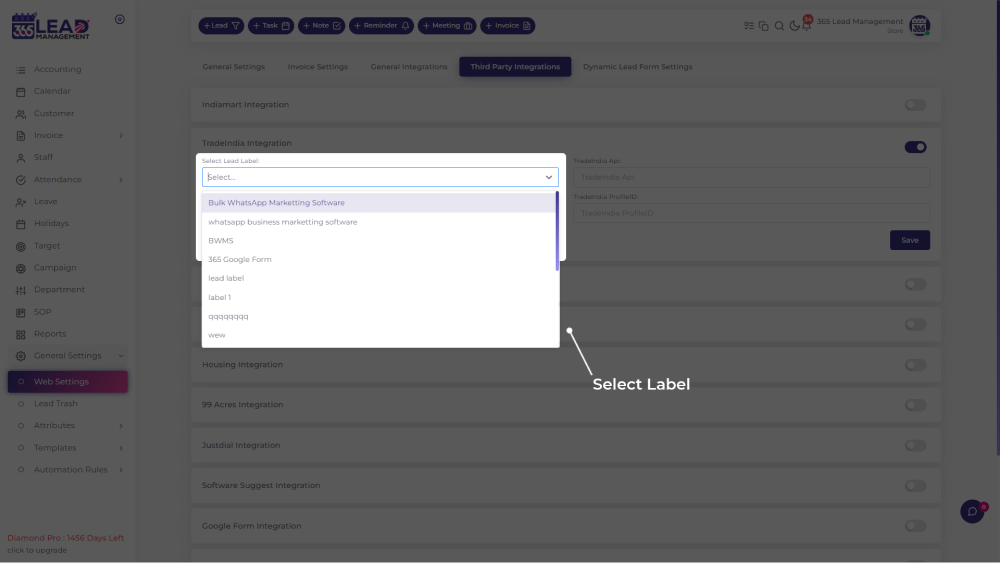
- Go to General Settings >> Web Setting >> Third Party Integration >> Tradeindia Integration Form
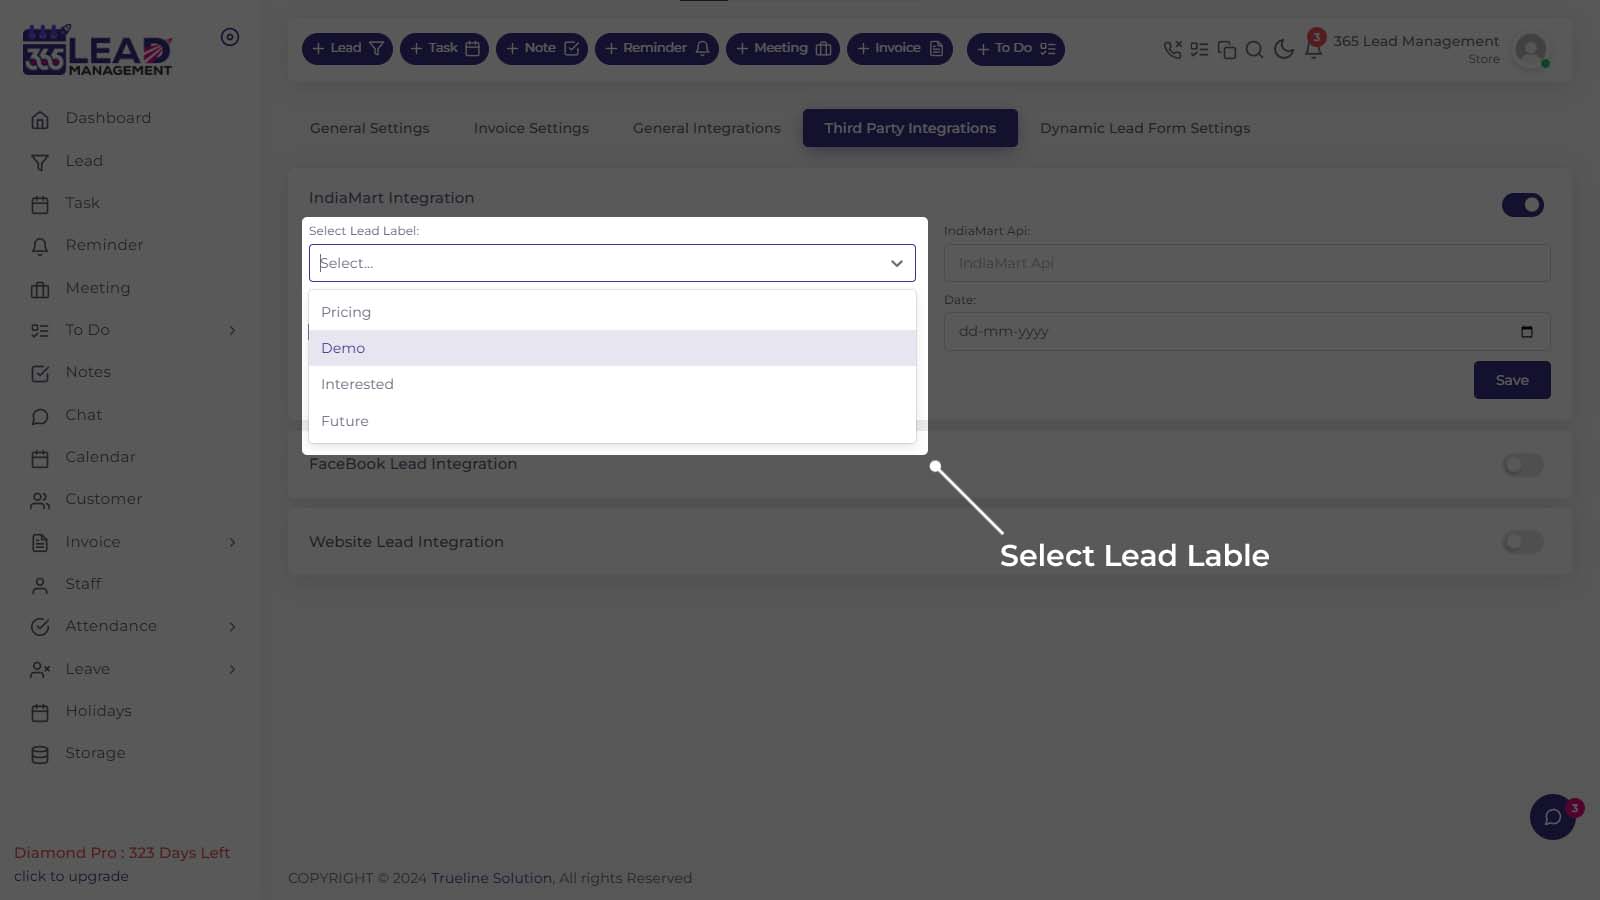
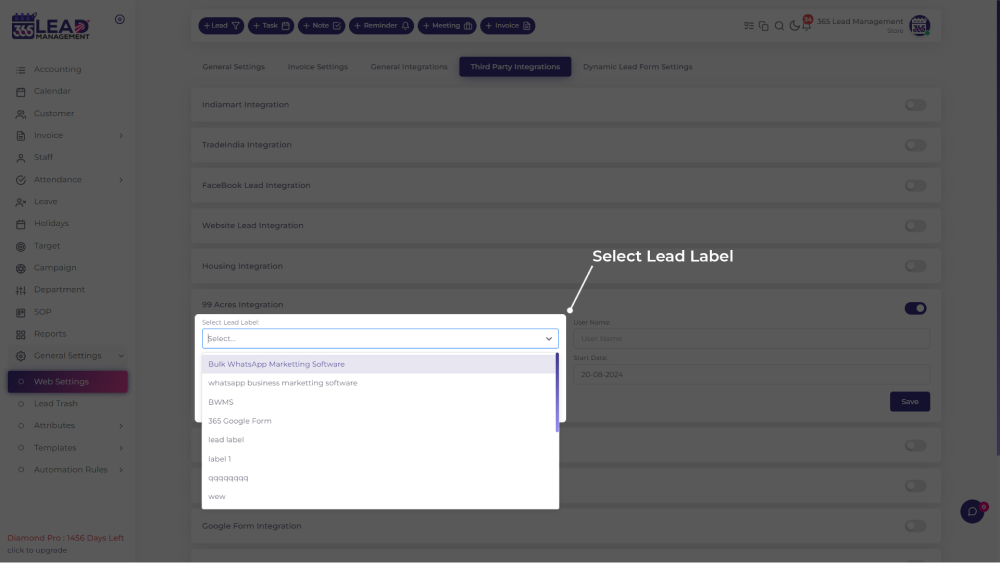
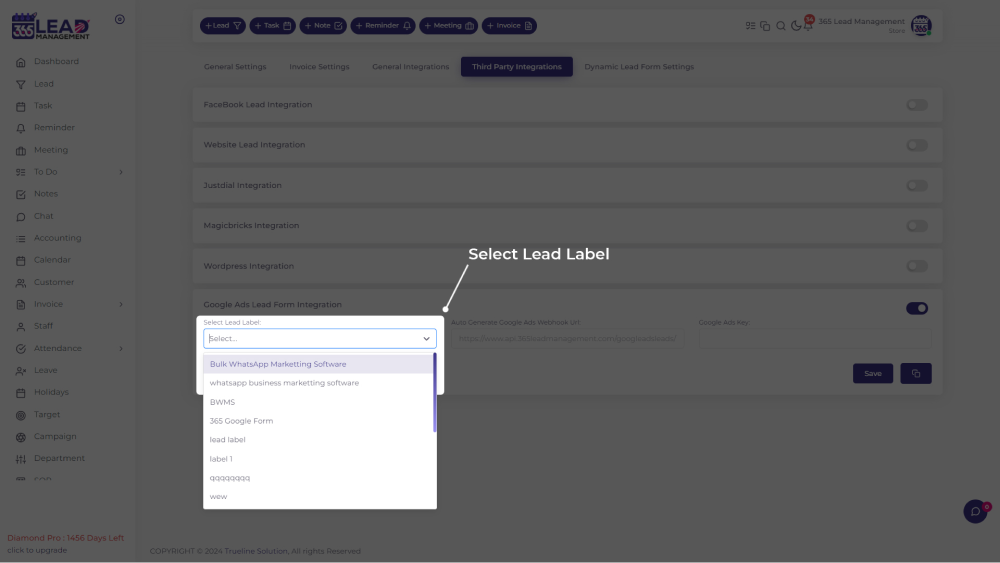
- Select the appropriate Lead Label from the dropdown menu.
- Enter the copied User ID, Profile ID, and API Key into the respective fields.
- Click Save to establish the connection.

Click Here to download the Lead Integration Plugins
Step 2 : Select Lead Label & Generate API
Go to General Setting >> Web Setting >> Third Party Integration >> Website Lead Setting >> Select Lead Label and Generate API


Step 3 : Copy API & Save
Go to General Setting >> Web Setting >> Third Party Integration >> Website Lead Setting >> Select Lead Label and Generate API >> Click On “Copy Icon” to Copy API Key >> Save


API Details
API
| POST | https://www.api.365leadmanagement.com/wpaddwebsiteleads |
Headers
| Authentication | Your API Key |
| Content – Type | Application / JSON |
Body (JSON)
customerName: New Lead from Web Site
customerEmail: Email
customerMobile: Mobile number
customerComment: Comment
Label: Your Label
Required Fields
- customerName
- customerMobile
Note: cutsomerMobile in country code include. Like, 919876543210
Step 1 : Generate CRM Key
Visit seller.indiamart.com, login to your account, then go to the Lead Manager and under the three dots menu ( ⋮ ) click on CRM Integration.

Or you can also directly go to the Key Generation Page using the following link:
https://seller.indiamart.com/leadmanager/crmapi
Now, click on Generate Key. A unique CRM key will be generated and will also be sent to the registered email-id.

Note: In case you have already generated the CRM key, you can refer to the same from your email or check the key generation screen for your active CRM key. The CRM key will expire if it is not used in the last 7 days. On clicking ‘Generate Key’, a new key will be generated & the older one will expire (if any key was already generated earlier, it will stop working).
Step 1 : Craete GoogleAds Form
Note: The customer must have a Google Ads account to use this feature.
- Create GoogleAds Form
- Link Account

Step 2 : Create Campaign Ad

Go to the >> Add features to your ads to get more clicks


fill this form and at the end of form there is one option called as Lead Delivery option
here add your 365 CRM Google Ads Lead Form url past here and key.

then create Your Campaign and test lead.
Step 1 : Just Dial Integration
Forward Instructions to your Account Manager
Connect to 365 Lead Management by submitting a request directly to your JustDial account manager. Please forward them the following instructions:
- Please send my JustDial leads to 365 Lead Management CRM. The steps to do so are as follows:
- My unique Webhook URL to send leads to: https://www.api.365leadmanagement.com/justdialleads/< Your KEY>/lead
Note: You can get the full URL from your 365 Lead Management account.
- My unique Webhook URL to send leads to: https://www.api.365leadmanagement.com/justdialleads/< Your KEY>/lead
Go to General Setting >> Web Setting >> Third Party Integration >> Just Dial Integration

Step 1 : Magicbricks Integration
Connect to 365 Lead Management by submitting a request directly to your MagicBricks account manager.
Please forward them the following instructions, and replace YOUR_USER_ID with your MagicBricks login ID:
- Please send my MagicBricks leads to 365 Lead Management CRM.
- My MagicBricks login ID is: YOUR_USER_ID
The required information is as follows:
- CET or non-CET client: Non-CET
- CRM service provider name: 365 Lead Management CRM
- Integration type: PUSH integration
- Working Endpoint: https://www.api.365leadmanagement.com/magicbricksleads/<YOUR KEY>/lead
Note: You can get the full URL from your 365 Lead Management account. - Sample URL: https://www.api.365leadmanagement.com/magicbricksleads/<YOUR KEY>/lead
Note: You can get the full URL from your 365 Lead Management account. - API Key: Not needed, this is included in the custom webhook URL above
- URL Parameters: Not needed, this is included in the custom webhook URL above
curl Example: curl --location 'https://api.365Leadmanagement.com/magicbricksleads/<365CRM-USER-KEY>/lead?name=leadname&mobile=919988774444&email=abc%40gmail.com&remark=remark&project=project%20name&pid=property%20id&api_key=63d5af44737e48cf9167ab5346352d7a091023054407&source=4&responsetype=lead&account=ravidarji13%40gmail.com'
Go to General Setting >> Web Setting >> Third Party Integration >> Magicbricks Integration

Step 1 : Log in to TradeIndia
- Visit www.tradeindia.com and log in to your account.
- Click on your profile icon at the top-right corner.
- From the dropdown menu, select Inquiries under My Account.

Step 2 : Access Leads and Inquiries
- See the "Leads and Inquiries" menu – It will automatically expand by default.
- Select "My Inquiry API" to access the API integration section.

Copy the following details from the My Inquiry API section:
- User ID
- Profile ID
- API Key
These details will be used to connect TradeIndia with 365 CRM.

Step 3 : TradeIndia Integration in 365 CRM
- Log in to your 365 Lead Management CRM account.
- Go to General Settings >> Web Setting >> Third Party Integration >> Tradeindia Integration Form
- Select the appropriate Lead Label from the dropdown menu.
- Enter the copied User ID, Profile ID, and API Key into the respective fields.
- Click Save to establish the connection.


Click Here to download the Lead Integration Plugins
